# Event listeners
- Events are triggered all the time inside a webpage
- The browser itself already generates a number of events, for example after loading the page, when resizing the window, ...
- The user can also trigger events, for example by clicking on a link, pressing a key, scrolling with the mouse, submitting a form, ...
- A complete list of all possible events (opens new window) can be found on the Mozilla website
- With event listeners we can interact (run a function) every time the event takes place
- On this page we discuss a few commonly used events
- If you understand how this works you can make your own event listeners to interact with every possible event
- An event listener has always two (sometimes three) parameters:
- first the
<event>to watch for, - second the callback function that will be executed when the event fires
- third and optional a boolean value to disable event bubbling (default value for bubbling is
true)
- first the
<element>.addEventListener('<event>', function(e) { // do something when the <event> is triggered // 'e' is the event itself }); // or with an arrow function <element>.addEventListener('<event>', e => { // ... });Copied!
1
2
3
4
5
6
7
8
9
2
3
4
5
6
7
8
9
# Mouse events
- In this example, we use four mouse events
| event | description |
|---|---|
click | the mouse button is pressed and released on an element |
dblclick | the mouse button is clicked twice on an element |
mouseenter | the cursor comes over an element |
mouseleave | the cursor leaves an element |
# Static animation
- Open es6/events/mouse_1.html and es6/events/mouse_1.js
HTML and CSS
JavaScript
result
- Line 5 to 7: the embedded styles are only used to give both sections a background color
- Line 14 to 16: every button triggers a
clickevent to show/hide#section1 - Line 20 to 22: hovering
#section2will rotate#section1around the X-axis
<html lang="en"> <head> ... <style> section, div { margin: 0.5rem; } #section1 { background-color: lightsalmon; } #section2 { background-color: lightgreen; } </style> </head> <body> ... <main class="container"> ... <button id="hide" type="button" class="primary">Click to hide #section1</button> <button id="show" type="button" class="primary">Click to show #section1</button> <button id="toggle" type="button" class="primary">Double-click to toggle #section1</button> <section id="section1" class="bordered"> ... </section> <section id="section2" class="bordered"> ... </section> ... </main> ... </body> </html>Copied!
1
2
3
4
5
6
7
8
9
10
11
12
13
14
15
16
17
18
19
20
21
22
23
24
25
26
27
2
3
4
5
6
7
8
9
10
11
12
13
14
15
16
17
18
19
20
21
22
23
24
25
26
27
# Dynamic animation
- The "animations" in the previous example are very straightforward
- Open es6/events/mouse_2.html and es6/events/mouse_2.js
- In this example, we change the layout with classes instead of inline CSS
- show/hide will be replaced with a nice slide-up/slide-down effect
- the rotate effect will be replaced with a 3D effect
- All effects will take 1 second
- In this example, we change the layout with classes instead of inline CSS
HTML and CSS
JavaScript
result
- Line 8: the transition for all effects on
#section1is set to 1 second - Line 9: it's not possible to animate the
heightattribute over time, but you can use themax-height
(for now, set themax-heightto a value higher the actual height of the element) - line 10: for the slide-up effect we set
overflowtohiddenbecause otherwise only box itself will close, but the content inside the box stays visible - Line 13 to 16: adding the class
.hideto#section1provides the slide-up effect:- the
max-heightgoes from300pxto0px - the
opacitygoes from1to0 - for the slide-down effect we have to remove the class
.hidefrom#section1
- the
- Line 17 to 19: adding the class
.flipto#section1provides the 3D flip effect
(without theperspective()it's only a 2D effect)
<html lang="en"> <head> ... <style> section, div { margin: 0.5rem; } #section1 { background-color: lightsalmon; transition: 1s; max-height: 300px; overflow: hidden; opacity: 1; } #section1.hide { max-height: 0; opacity: 0; } #section1.flip { transform: perspective(300px) rotateX(180deg); } #section2 { background-color: lightgreen; } </style> </head> <body> ... </body> </html>Copied!
1
2
3
4
5
6
7
8
9
10
11
12
13
14
15
16
17
18
19
20
21
22
23
24
25
26
2
3
4
5
6
7
8
9
10
11
12
13
14
15
16
17
18
19
20
21
22
23
24
25
26
# Window events
- Problems with the previous example:
- we need the
max-heightfor the animation, buth we have to "guess" what the value is - the actual height of
#section1changes when we resize the page
- we need the
- In this example we constantly (re)calculate the real
heightof#section1and set it as themax-heightof the container - This can be done with the
resizeevent listener on thewindowobject - Open es6/events/window.html and es6/events/window.js
HTML and CSS
JavaScript
result
- Line 9: remove the
max-heightof#section1because we're going to calculate the height dynamically and add/update it as an inline style on#section1 - Line 14: add
!importantto themax-heightof#section1because otherwise we can't overwrite the inlinemax-height
<html lang="en"> <head> ... <style> section, div { margin: 0.5rem; } #section1 { background-color: lightsalmon; transition: 1s; /* max-height: 300px; */ overflow: hidden; opacity: 1; } #section1.hide { max-height: 0 !important; /* override inline css with !important */ opacity: 0; } #section1.flip { transform: perspective(300px) rotateX(180deg);} #section2 { background-color: lightgreen; } </style> </head> <body> ... </body> </html>Copied!
1
2
3
4
5
6
7
8
9
10
11
12
13
14
15
16
17
18
19
20
21
22
23
24
2
3
4
5
6
7
8
9
10
11
12
13
14
15
16
17
18
19
20
21
22
23
24
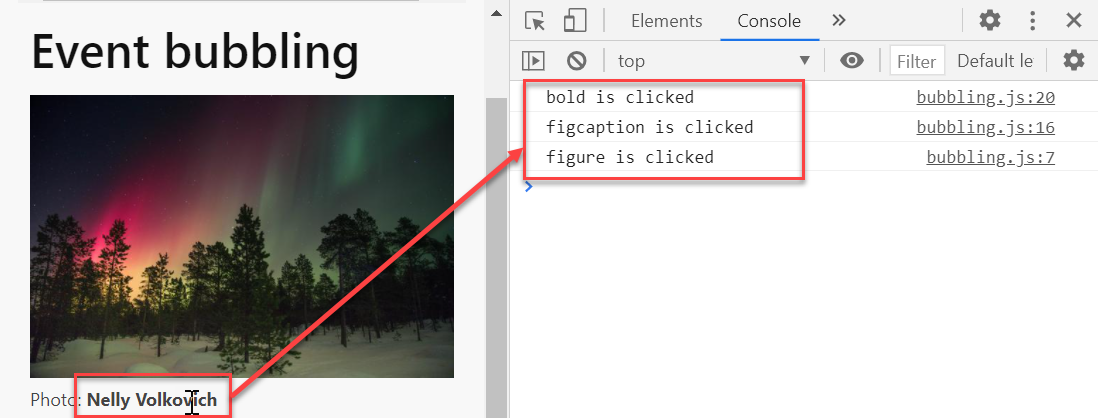
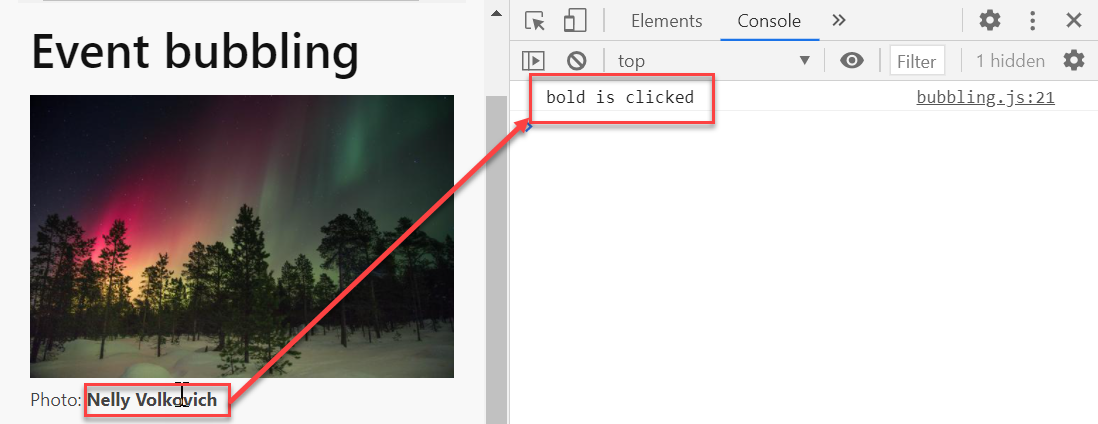
# Event bubbling
- When an event happens on an element, it first runs the callback function of the corresponding event listener after which the event bubbles up the DOM tree
- Open es6/events/bubbling.html and es6/events/bubbling.js
- Look at the DOM structure
- We set a
clickevent on thefigure, theimg, thefigcaptionand thebtag inside thefigcaption

- When you click on the
belement, the event bubbles up the DOM tree, and (it looks as) you also have clicked on thefigcaptionand on thefigure!- Sometimes this may lead to unexpected behavior ...
HTML
JavaScript
clicked on b element
<main class="container"> <h1>Event bubbling</h1> <figure> <img src="https://picsum.photos/id/724/600/400" alt="Northern light" /> <figcaption>Photo: <b>Nelly Volkovich</b></figcaption> </figure> ... </main>Copied!
1
2
3
4
5
6
7
8
2
3
4
5
6
7
8
- You can stop this "bubbling" behavior by adding the
stopPropagation()(opens new window) method to the event
stop event bubbling
clicked on b element
... bold.addEventListener('click', function (e) { e.stopPropagation(); console.log('bold is clicked'); });Copied!
1
2
3
4
5
6
2
3
4
5
6
# Prevent default action
- Sometimes you want to prevent the default action from being executed, for example:
- click on a link but don't go directly to the
href - do some client-side validation before actually submitting a form
- ...
- click on a link but don't go directly to the
- You can do so by adding the
preventDefault()(opens new window) method to the event - Open es6/events/preventDefault.html and es6/events/preventDefault.js
HTML
JavaScript
result
... <main class="container"> <h1>Dispatch event</h1> <h1>Prevent default action</h1> <p>Link to <a href="https://bing.com" id="bing">bing.com</a></p> <form id="searchForm" action="https://google.com/search" method="get" target="_blank"> <label for="q">Search on Google</label> <input type="text" name="q" id="q" /> <button type="submit" class="primary">Submit</button> </form> <pre></pre> ... </main>Copied!
1
2
3
4
5
6
7
8
9
10
11
12
13
2
3
4
5
6
7
8
9
10
11
12
13
# Dispatch (trigger) event
- The
dispatchEvent()(opens new window) method automatically triggers an event - Open es6/events/dispatch.html and es6/events/dispatch.js
- When the page loads, the
clickevent on the button is automatically triggered
- When the page loads, the
HTML
JavaScript
result
... <main class="container"> <h1>Dispatch event</h1> <button type="button" class="primary">button</button> <pre></pre> ... </main>Copied!
1
2
3
4
5
6
7
2
3
4
5
6
7

# Event on a NodeList
- To add an event listener (listening to the same event and with the same callback function) to every element inside a NodeList, you first have to loop over the NodeList and add the event listener inside the loop
- Open es6/events/nodelist.html and es6/events/nodelist.js
HTML
JavaScript
result
<div id="buttongroup"> <button class="primary">primary button</button> <button class="secondary">secondary button</button> <button class="tertiary">tertiary button</button> </div>Copied!
1
2
3
4
5
2
3
4
5
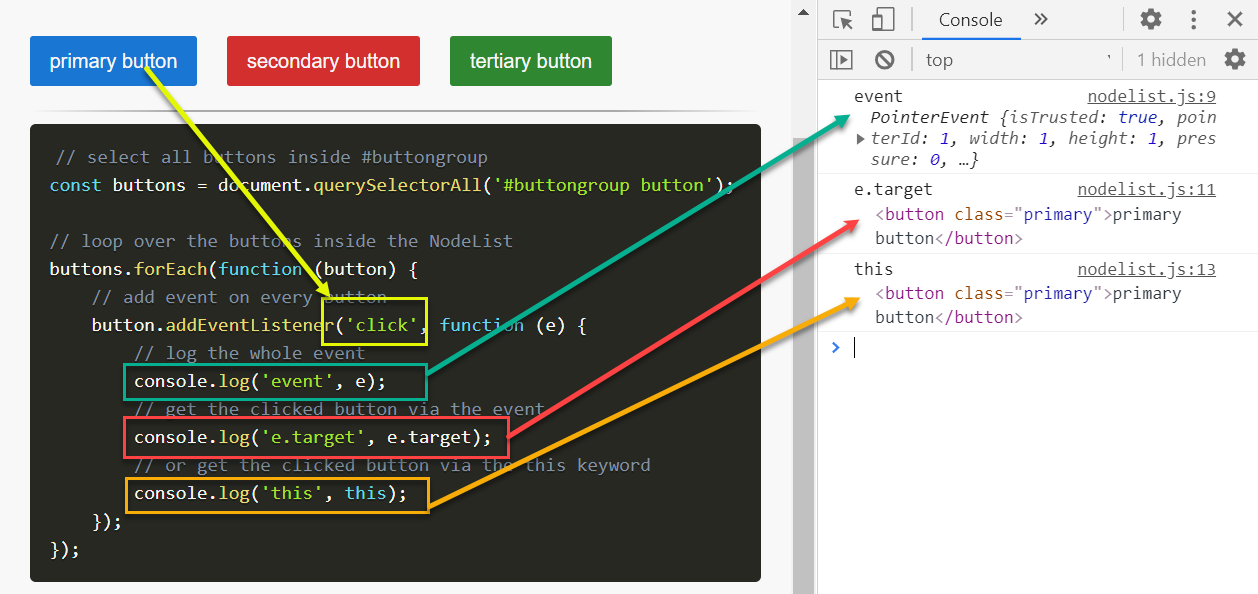
REMARKS: The 'this' keyword
- In JavaScript the keyword
this(opens new window) refers to the object it belongs to - In our event, the
thiskeyword refers to the button that was clicked on, soe.targetandthismean exactly the same
# Reuse callback functions
- Sometimes multiple event listeners use the same callback function
- To keep your code DRY (Don't Repeat Yourself), you can move the callback to a separate function and reuse it for multiple events
- Functions will be discussed in more detail later in this course
<element>.addEventListener('<event>', function (e) { // callback function }); // is the same as function cb(e) { // callback function } <element>.addEventListener('<event>', cb);Copied!
1
2
3
4
5
6
7
8
9
10
2
3
4
5
6
7
8
9
10
WARNING
- Never use parentheses when referring to the callback function
- Good:
<element>.addEventListener('<event>', cb); - Wrong:
<element>.addEventListener('<event>', cb());
- Good:
# Exercises
- Open exercises/index.html and make the exercises under the tab ES6 > Event listeners