# Debugging
- Debugging your code is very important when writing JavaScript
- If there is an error in your script, the execution will stop at that point, and the rest of your code will not be executed
- All errors will be displayed inside DevTools (
F12) under the Console tab

TIP
A good JavaScript developer always has his DevTools (F12) console open!
# Writing to the Console
- Open es6/debug/debug.html and es6/debug/debug.js
# Common console output
- As a developer, you can also write data to the console (yourself)
- This is especially useful to check the state or value of a variable at certain points during the execution
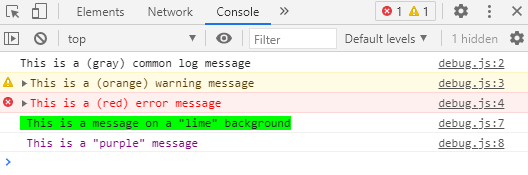
- The three most used console outputs are:
console.log(): outputs on a gray backgroundconsole.error(): outputs on a red backgroundconsole.warn(): outputs on an orange background
TIPS
- If you wish, you can use CSS to style your console output:
- Start the output string with
%c - Add a second parameter that contains the CSS styles for the output
- Start the output string with
- The console window can be emptied by the statement
console.clear()or by right-clicking in the console and choosing 'Clear console'
// Most used console outputs
console.log('This is a (gray) common log message');
console.warn('This is a (orange) warning message');
console.error('This is a (red) error message');

// Use custom colors
console.log('%c This is a message on a "lime" background', 'background: lime');
console.log('%c This is a "purple" message ', 'color: purple');
1
2
3
4
5
6
7
8
2
3
4
5
6
7
8
# Output multiple values
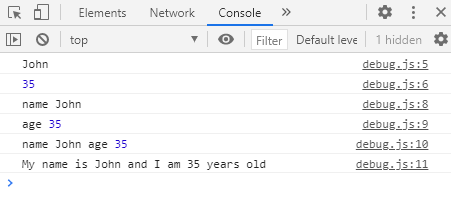
- If you output multiple values in your console, it's best to "document" each line/variable in the console
- Log multiple items together by separating them with a comma or by using template literals (back ticks) to combine everything in one line
// Log the value of a variable
const name = 'John';
const age = 35;
// Bad
console.log(name);
console.log(age);
// Good
console.log('name', name);
console.log('age', age);
console.log('name', name, 'age', age);
console.log(`My name is ${name} and I am ${age} years old`);
1
2
3
4
5
6
7
8
9
10
11
2
3
4
5
6
7
8
9
10
11
# Tabular output
- When outputting large datasets, like arrays, it's not always obvious to find the data you want
console.table()displays the data in a nicely formatted table- If the dataset is too large/complicated, you can add a second parameter to reduce the content inside the table
// Log objects as a table
const fruits = ['kiwi', 'pineapple', 'mango', 'apple'];
console.log('fruits', fruits);
console.table(fruits);

const users = [
    { name: 'John', surname: 'Doe', age: 23 },
    { name: 'Jane', surname: 'Doe', age: 41 },
];
console.log('users', users);
console.table(users);
console.table(users, ['name', 'age']);
1
2
3
4
5
6
7
8
9
10
11
12
2
3
4
5
6
7
8
9
10
11
12

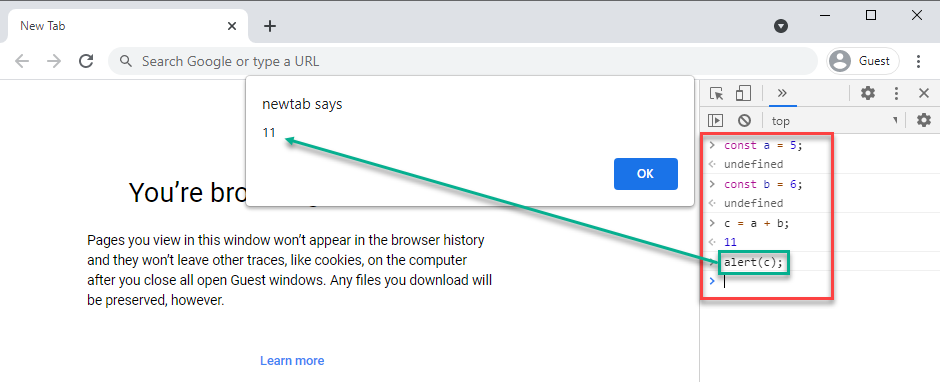
# REPL
- REPL stands for Read-Eval-Print-Loop
- It is a quick and easy way to test simple JavaScript code straight from the Chrome developer console
- Open a new tab in Chrome and type in the console:
const a = 5;const b = 6;c = a + b;alert(c);
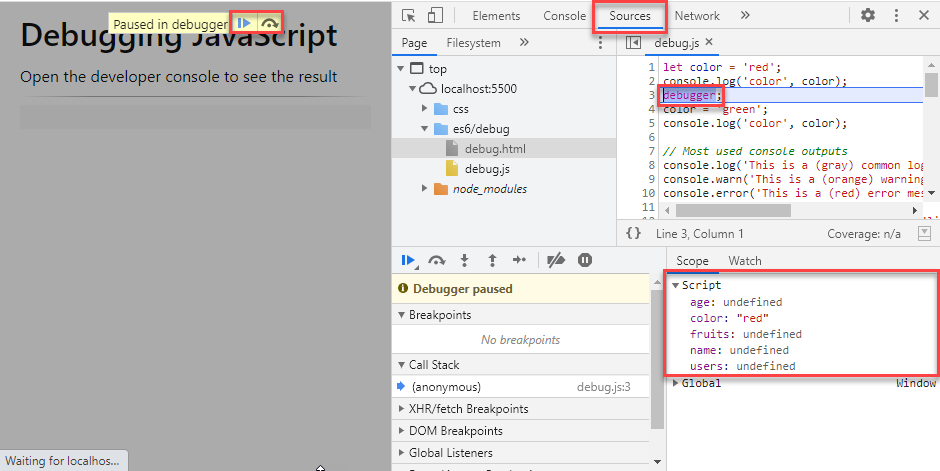
# Breakpoints (OPTIONAL)
- Add a
debuggerstatement to temporary pause the execution - The state of all variables, even the variables that are defined later in the script, are shown under the Sources tab
- Next, you can resume the script execution (
F8) or proceed statement by statement (F10)
let color = 'red';
console.log('color', color);
debugger;
color = 'green';
console.log('color', color);
...
1
2
3
4
5
6
2
3
4
5
6