# DOM manipulation
- The Document Object Model (DOM) represents the document (the web page) as a tree of nodes (or objects or elements)
- With JavaScript, you can modify (add/remove/change) the entire DOM
| node types | description |
|---|---|
| window | represents the browser window |
| document | represents the entire document (the root node of the DOM tree) |
| element node | represents an element (an HTML tag) |
| attribute node | the attribute of an element |
| text node | the text inside an element |
| comment node | comments inside an element |

REMARK
- The Elements tab inside Chrome's DevTools shows the (modified) DOM (after execution of the scripts), which can differ a lot from the original HTML code (
CTRL+U)- For example for stubru.be (opens new window), both the original HTML code (only scripts!) and the DOM code are very different ...
# Select elements
- Before you can modify the DOM, we first have to select an element on the page
- The four most commonly used selection methods are:
| selector | description |
|---|---|
document.body (opens new window) | select the body element |
document.getElementById(<id>) (opens new window) | select the element whose id equals <id> |
document.querySelectorAll(<CSS selector>) (opens new window) | select ALL elements matching <CSS selector> |
document.querySelector(<CSS selector>) (opens new window) | select THE FIRST element matching <CSS selector> |
- Open the developer console on this page and use REPL to select some elements
document.bodydocument.getElementById('app')document.querySelector('img')document.querySelector('img[alt=DOM]')document.querySelectorAll('h2')

TIP
You can test your CSS selector knowledge using document.querySelectorAll() on this page:
https://itf-es6.netlify.app/es6/dom/querySelector.html (opens new window)
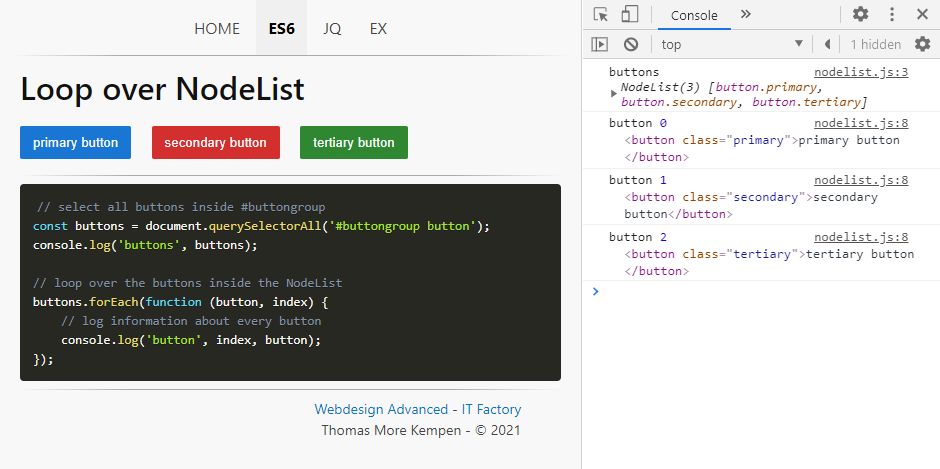
# Loop over NodeList
document.getElementById()anddocument.querySelector()always return one element- On the other hand,
document.querySelectorAll()always returns a NodeList, even if there is only one item selected - A NodeList can be iterated as an array
- We are going to demonstrate briefly how to retrieve and use each element within a NodeList (such that we can use it later on in the course and in the exercises)
- Open es6/dom/nodelist.html and es6/dom/nodelist.js, where we have a list of buttons and want some information about every button:
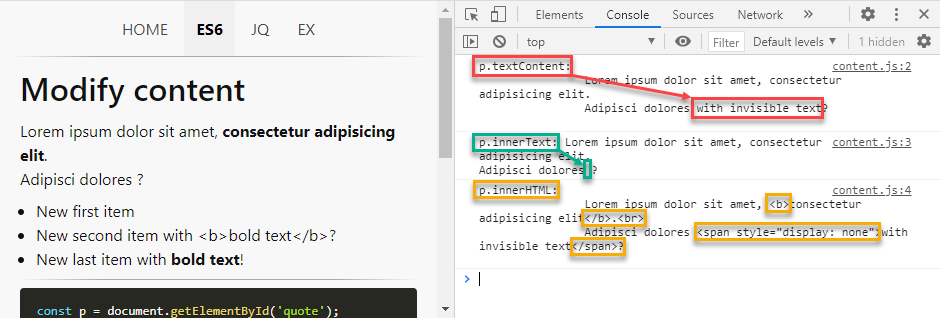
# Modify content
| property | description |
|---|---|
<element>.textContent (opens new window) | get or set ALL text inside the <element> (including spaces and hidden text) |
<element>.innerText (opens new window) | get or set only the VISIBLE text inside the <element> (including spaces but without hidden text) |
<element>.innerHTML (opens new window) | get or set the HTML content inside <element> |
- Open es6/dom/content.html and es6/dom/content.js
# Modify attributes
- Every HTML element can have some (default) attributes: e.g.
src,title,href, ...
| method | description |
|---|---|
<element>.getAttribute(<attribute>) (opens new window) | get the <attribute> of the <element> |
<element>.setAttribute(<attribute>, <value>) (opens new window) | set the <attribute> of the <element> to <value> |
<element>.<attribute> | shorthand to get/set the <attribute> of the <element> |
<element>.hasAttribute(<attribute>) (opens new window) | check if the <attribute> exists on the <element>:returns true or false |
<element>.removeAttribute(<attribute>) (opens new window) | remove the <attribute> on the <element> |
<element>.attributes | get all the attributes on the <element> |
- Open es6/dom/attributes.html and es6/dom/attributes.js


WARNING
- Always use
<element>.valueto get/set thevalueof an input/form element<element>.getAttribute('value')returns the initial value of the element'svalueattribute (even if/after the input element is changed by the user!)<element>.setAttribute('value', ...)(only) changes the (initial)valueattribute of the element (and not the current value of the element)
# The data-* attribute
data-*attributes are a very handy way to add valid, custom attributes to an element (and thus, to store custom data with an element)- The attribute name should not contain any uppercase letters, and must be at least one character long after the
data-prefix- Examples:
data-id,data-photographer,data-unsplash-url, ...
- Examples:
data-*attributes are available via thedatasetproperty:
| property | example | description |
|---|---|---|
<element>.dataset.* (opens new window) | get or set the data-* attribute of the <element> | |
<element>.dataset.photographer | use only the suffix after data-( data-abc <=> <element>.dataset.abc) | |
<element>.dataset.unsplashUrl | if the suffix contains (a) hypen(s), write the suffix in camelCase ( data-abc--opq-xyz <=> <element>.dataset.abcOpqXyz |
- Open es6/dom/data_attributes.html and es6/dom/data_attributes.js


# Modify classes
| property | description |
|---|---|
<element>.className (opens new window) | get or replace all the classes on the <element> |
<element>.classList (opens new window) | get all the classes on the <element> |
<element>.classList.add(<c1>, ...) | add class(es) to the <element> |
<element>.classList.remove(<c1>, ...) | remove class(es) from the <element> |
<element>.classList.replace(<c1>, <c2>) | replace class <c1> by <c2> on the <element> |
<element>.classList.toggle(<c>) | toggle the class <c> on the <element>:- add the class if it doesn't exist - remove the class if it exists |
<element>.classList.contains(<c>) | check if the class <c> exists on the <element>:returns true or false |
- Open es6/dom/classes.html and es6/dom/classes.js


# Modify inline styles
| property | description |
|---|---|
<element>.style (opens new window) | get all the inline style properties on the <element> |
<element>.style.<property> | get/set the inline style <property> on the <element>(use camelCase notation for multi-word properties) |
<element>.style.<property> = '' | set the new value to an empty string to remove the <property> |
- Open es6/dom/styles.html and es6/dom/styles.js
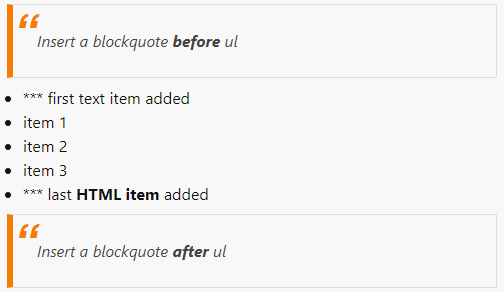
# Modify elements
| property | description |
|---|---|
<element>.remove() (opens new window) | remove <element> from the DOM |
document.createElement(<tag>) (opens new window) | create an element node of type <tag> |
document.createTextNode(<str>) (opens new window) | create a text node containing <str>(not really necessary if you use innerHTML, innerText or textContent) |
<element>.replaceWith(<node(s)>) (opens new window) | replace the selected <element> with new <node(s)> |
<element>.append(<node(s)>) (opens new window) | insert <node(s)> at the end of the selected <element> |
<element>.prepend(<node(s)>) (opens new window) | insert <node(s)> at the beginning of the selected <element> |
<element>.before(<node(s)>) (opens new window) | insert <node(s)> before the selected <element> |
<element>.after(<node(s)>) (opens new window) | insert <node(s)> after the selected <element> |
- Open es6/dom/elements.html and es6/dom/elements.js