# Forms
- We use forms to make our websites more interactive as we allow visitors to enter and send data to us
- The content of the form is built with HTML5
- The styling is achieved with CSS3
# Tags related to forms
| tag | description |
|---|---|
| <form> | HTML form for user input |
| <input> | element that accepts input from user |
| <label> | defines a label for form elements |
| <textarea> | defines a multi-line input field |
| <select> | defines a (drop-down) list |
| <optgroup> | defines a group of related options in a (drop-down) list |
| <option> | defines an option in a (drop-down) list |
| <fieldset> | groups related elements in a form |
| <legend> | defines a caption for a fieldset element |
| <button> | defines a clickable button |
# A sample form (unstyled)
<form action="https://it-fact.be/form.php" method="post">
    <h1>Register</h1>
    <p>
        <label for="name">Name<sup>*</sup></label>
        <input type="text" id="name" size="40" maxlength="20" name="name" placeholder="Enter your name" autofocus required>
    </p>
    <p>
        <label for="password">Password</label>
        <input type="password" id="password" size="15" maxlength="20" name="password" value="test">
    </p>
    <p>
        <input type="hidden" name="userid" value="-1">
    </p>
    <p>
        <label for="url">Website</label>
        <input type="url" id="url" name="url" placeholder="your website url">
    </p>
    <p>
        <label for="zip">Zip code</label>
        <input type="text" id="zip" name="zip" pattern="[0-9]{4}">
    </p>
    <p>
        <label for="email">Email<sup>*</sup></label>
        <input type="email" id="email" name="email" required>
    </p>
    <p>
        <label for="range">jQuery knowledge</label>
        <input type="range" id="range" name="range" min="0" max="100" step="5" value="10">
    </p>
    <p>
        <label for="age">Current age</label>
        <input type="number" id="age" name="age" min="17" max="100" step="1" value="18">
    </p>
    <p>
        <label for="query">Popular search term</label>
        <input type="search" id="query" name="query">
    </p>
    <p>
        <label for="tel">Tel</label>
        <input type="tel" id="tel" name="tel">
    </p>
    <p>
        <label for="tel2">Tel 2<sup>*</sup></label>
        <input type="tel" id="tel2" name="tel2" pattern="0(\d{2,3}\/\d{6}|\d\/\d{7})" required>
    </p>
    <p>
        <input type="checkbox" id="car" name="mobility1" value="car">
        <label for="car"> I own a car </label>
    </p>
    <p>
        <input type="checkbox" id="bike" name="mobility2" value="bike" checked>
        <label for="bike"> I own a bike </label>
    </p>
    <p>
        <input type="radio" id="drivinglicense" name="driving" value="yes">
        <label for="drivinglicense">I have a driving license</label>
    </p>
    <p>
        <input type="radio" id="nodrivinglicense" name="driving" value="no" checked>
        <label for="nodrivinglicense">I don't have a driving license</label>
    </p>
    <p>
        <label for="remarks">Remarks:</label>
    </p>
    <p>
        <textarea rows="5" cols="25" id="remarks" name="remarks"></textarea>
    </p>
    <p>
        <label for="city">City: </label>
    </p>
    <p>
        <select id="city" name="city" size="3">
            <option value="G">Geel</option>
            <option value="T">Turnhout</option>
            <option value="H">Herentals</option>
            <option value="M" selected>Mol</option>
        </select>
    </p>
    <p>
        <label for="activity">Choose an activity: </label>
    </p>
    <p>
        <select id="activity" size="8" name="activity">
            <optgroup label="Indoor">
                <option value="snk">Snooker</option>
                <option value="drts">Darts</option>
            </optgroup>
            <optgroup label="Outdoor">
                <option value="tennis" selected>Tennis</option>
                <option value="soccer">Soccer</option>
                <option value="geoc">Geocaching</option>
            </optgroup>
        </select>
    </p>
    <fieldset>
        <legend>Native Belgian</legend>
        <p>
            <input type="radio" id="yes" name="native" value="yes">
            <label for="yes">Yes</label>
        </p>
        <p>
            <input type="radio" id="no" name="native" value="no" checked>
            <label for="no">No</label>
        </p>
    </fieldset>
    <p>
        <input type="submit" value="Send">
    </p>
    <p>
        <input type="reset" value="Reset">
    </p>
    <p>
        <button>Simple button</button>
    </p>
</form>
# The <form> tag
- The tags
<form>and</form> define the beginning and the end of a form - Block level element
- Can contain other block level elements, like paragraphs,
div's, ...
- Can contain other block level elements, like paragraphs,
| attribute | required/optional | description |
|---|---|---|
| action | required | specifies where to send the form data when a form is submitted |
| method | optional | specifies the HTTP method to use when sending form data (get = default or post) |
| novalidate | optional | specifies that the form should not be validated when submitted |
# GET method
- Form data is added to the URL when the form is submitted
<form action="https://it-fact.be/form.php" method="get">
    <h1>Register</h1>
    <p>
        <label for="name">Name</label>
        <input type="text" id="name" size="40" maxlength="20" name="name" placeholder="Enter your name" autofocus>
    </p>
    <p>
        <label for="password">Password</label>
        <input type="password" id="password" size="15" maxlength="20" name="password" value="test">
    </p>
    <p>
        <input type="submit" value="Send">
    </p>
</form>
- Open both the Codepen above and the developer tools ('Network' tab)
- Fill in the 'Name' and 'Password' fields and submit the form (by clicking the 'Send' button)
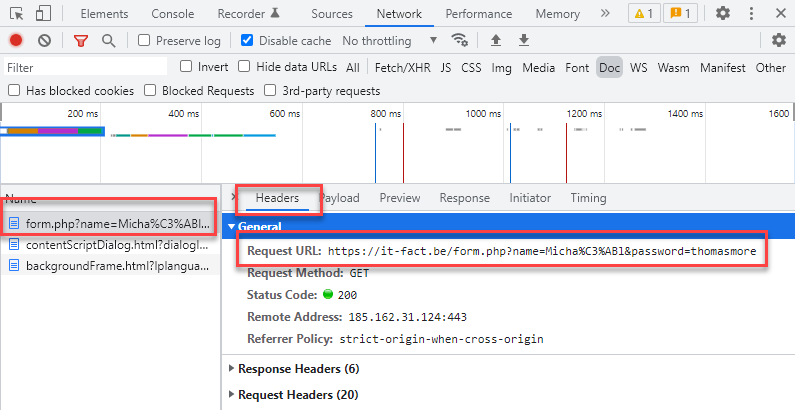
- Notice that the form is sent to
https://it-fact.be/form.php?name=Micha%C3%ABl&password=thomasmore:
REMARKS
- The entered values are added to the URL as key/value pairs, in which the key corresponds to the
nameattribute of the form element:key = nameattribute of form elementvalue name Michaël password thomasmore - Special characters are URL-encoded (opens new window):
%C3%ABis the UTF-8 form ofë
- form.php is a PHP file which can read and display all the incoming values
$_GET(and$_POST) are PHP super global variables used to collect form data. They can be looped to display all key/value pairs.
<!doctype html>
<html lang="en">
<head>
    <meta charset="UTF-8">
    <meta name="viewport" content="width=device-width, initial-scale=1.0">
    <title>Form</title>
    <script src="https://cdn.tailwindcss.com?plugins=typography"></script>
</head>
<body class="prose p-8 bg-gray-100">
<?php if($_GET) { ?>
<div class="bg-white border rounded-lg shadow-lg mb-6 p-4">
    <h1 class="text-2xl">Form values (GET)</h1>
    <ul>
        <?php
        foreach ($_GET as $key => $value) {
            $value = is_array($value) ? implode(", ",$value) : $value;
            echo "<li>'$key' : '$value'</li>\n";
        }
        ?>
    </ul>
</div>
<?php  } elseif ($_POST) { ?>
<div class="bg-white border rounded-lg shadow-lg mb-6 p-4">
    <h1 class="text-2xl">Form values (POST)</h1>
    <ul>
        <?php
        foreach ($_POST as $key => $value) {
            $value = is_array($value) ? implode(", ",$value) : $value;
            echo "<li>'$key' : '$value'</li>\n";
        }
        ?>
    </ul>
</div>
<?php } ?>
<div>
    <button id="backbutton" class="uppercase rounded px-2 rounded-lg shadow-lg
        border border-green-600 bg-green-500 text-green-100 font-semibold
        hover:bg-green-200 hover:text-green-600 transition">
        Go Back
    </button>
</div>
<script>
    document.getElementById("backbutton").addEventListener("click", () => {
        window.history.back();
    });
</script>
</body>
</html>
1
2
3
4
5
6
7
8
9
10
11
12
13
14
15
16
17
18
19
20
21
22
23
24
25
26
27
28
29
30
31
32
33
34
35
36
37
38
39
40
41
42
43
44
45
46
47
48
2
3
4
5
6
7
8
9
10
11
12
13
14
15
16
17
18
19
20
21
22
23
24
25
26
27
28
29
30
31
32
33
34
35
36
37
38
39
40
41
42
43
44
45
46
47
48
REMARK
You should be able to understand/duplicate the PHP code above, but you don't have to be able to write such PHP code yourself (yet), as this will be the topic of the course Web Applications in PHP (2ITF)
REMARK: When to use GET?
- A HTTP GET request is used to request data from a specified resource - As such, the example above (to register yourself at a website using a GET request) is just for illustration purposes and should not be duplicated due to the security risk involved: the GET method adds the password in plain text to the URL (although it might seem secure because the input is masked with dots)
# POST method
- Form data is added to the body of the request when the form is submitted
<form action="https://it-fact.be/form.php" method="post">
    <h1>Register</h1>
    <p>
        <label for="name">Name</label>
        <input type="text" id="name" size="40" maxlength="20" name="name" placeholder="Enter your name" autofocus>
    </p>
    <p>
        <label for="password">Password</label>
        <input type="password" id="password" size="15" maxlength="20" name="password" value="test">
    </p>
    <p>
        <input type="submit" value="Send">
    </p>
</form>
- Open both the Codepen above and the developer tools ('Network' tab)
- Fill in the 'Name' and 'Password' fields and submit the form
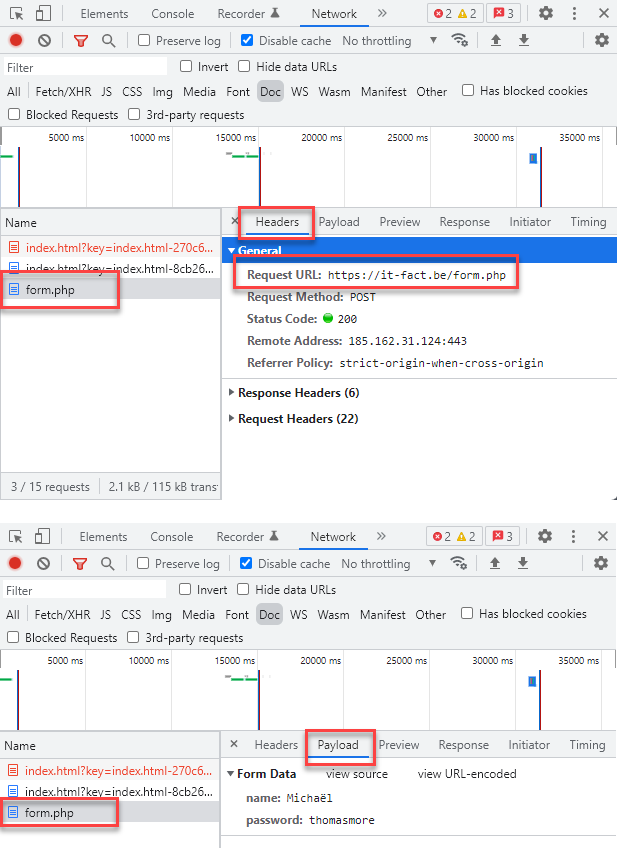
- Notice that the form is sent to
https://it-fact.be/form.phpwithout the entered values in the URL but with these values in the body of the HTTP request:
REMARK: When to use POST?
- A HTTP POST request is used to send data to a server to create a resource (in this case a new user at a website) - Yet, there is still a security risk involved in the example above as the password is stored in plain text (in the body of the request)
REMARK: Other common methods?
There are some other methods that can be used to communicate with the server.
- PUT: A HTTP PUT request is used to replace the target resource, in other words, to do a complete update of an object.
- PATCH: A HTTP PATCH request is used to partially modify the target resource, to update only a part of an object.
- DELETE: A HTTP DELETE request is used to delete a resource, as the name implies. These methods will not be used in this course but are usefull once you start building full web application. It is important to use the right method for your request.
# The <input> tag
- The
<input>tag specifies an input field where the user can enter data - Empty tag (without an extra closing tag)
| attribute | required/optional | description |
|---|---|---|
| type | optional | specifies the type of input element to display (text = default, password, hidden, url, email, range, number, search, tel, checkbox, radio, ... ) |
| id | optional | specifies the id of the element (styling, hyperlinks, accessibility, scripting). Should be unique on the page! |
| name | optional | is used to reference form data after a form is submitted (key/value pair) |
| value | optional | specifies the value of the input element |
| placeholder | optional | specifies a short hint that describes the expected value of an input element |
# <input type="text">
- Defines a single-line text input field
| attribute | required/optional | description |
|---|---|---|
| size | optional | specifies the width, in characters, of an input element (default = 20) |
| pattern | optional | specifies a regular expression that the input element's value is checked against on form submission |
- By default no validation
- Add validation by specifying a regular expression (regex) in the
patternattribute- A regex is a sequence of characters that define a pattern
- In our example,
pattern="[0-9]{4}"only allows Belgian postal codes consisting of 4 digits between 0 and 9
REGEX READING TIPS
<form action="https://it-fact.be/form.php" method="post">
    <h1>Register</h1>
    <p>
        <label for="name">Name</label>
        <input type="text" id="name" size="40" name="name" placeholder="Enter your name" autofocus>
    </p>
    <p>
            <label for="zip">Zip code</label>
            <input type="text" id="zip" name="zip" pattern="[0-9]{4}">
        </p>
    <p>
        <input type="submit" value="Send">
    </p>
</form>
IMPORTANT
- For accessibility reasons, always link the
inputfield with alabelelement, such that clicking the label sets the focus on the input field- A label can be linked to any form element
- The link between the input element and the label is established by making the
idof theinputelement equal toforattribute on thelabel
<p>
    <label for="name">Name</label>
    <input type="text" id="name" name="name" />
</p>
1
2
3
4- Alternative solution: nest the
inputfield in thelabelelement
<p>
    <label
        >Name
        <input type="text" id="name" name="name" />
    </label>
</p>
1
2
3
4
5
6
TIP: autofocus
- The
autofocusattribute is used to place the cursor directly in the input field - Only use this attribute 1 time per page!
# <input type="password">
- Defines a password field (characters are masked)
<form action="https://it-fact.be/form.php" method="post">
    <p>
        <label for="password">Password</label>
        <input type="password" id="password" size="15" name="password" value="test">
    </p>
    <p>
        <input type="submit" value="Send">
    </p>
</form>
# <input type="hidden">
- Defines a hidden input field
- Used to pass info the user doesn't have to fill in
- Commonly used to store and pass primary key values
- In our example below, the value
-1is passed to the server, linked to the nameuserid
<form action="https://it-fact.be/form.php" method="post">
    <p>
        <input type="hidden" name="userid" value="-1">
    </p>
    <p>
        <input type="submit" value="Send">
    </p>
</form>
# <input type="url">
- Defines a field for entering a URL
- The input value is automatically validated before the form can be submitted
- Validation format:
urlscheme://restofurl
- Validation format:
<form action="https://it-fact.be/form.php" method="post">
    <p>
        <label for="url">Website</label>
        <input type="url" id="url" name="url" placeholder="your website url">
    </p>
    <p>
        <input type="submit" value="Send">
    </p>
</form>
# <input type="email">
- Defines a field for an e-mail address
- The input value is automatically validated to ensure it is a properly formatted e-mail address
- Validation format:
at least 1 character+@+at least 1 character
- Validation format:
<form action="https://it-fact.be/form.php" method="post">
    <p>
        <label for="email">Email</label>
        <input type="email" id="email" name="email">
    </p>
    <p>
        <input type="submit" value="Send">
    </p>
</form>
# <input type="range">
- Defines a field for entering a number whose exact value is not/less important (like a slider control)
| attribute | required/optional | description |
|---|---|---|
| min | optional | specifies the minimum value allowed (default = 0) |
| max | optional | specifies the maximum value allowed (default = 100) |
| step | optional | specifies the step size (default = 1) |
| value | optional | specifies the default value |
<form action="https://it-fact.be/form.php" method="post">
    <p>
        <label for="range">jQuery knowledge</label>
        <input type="range" id="range" name="range" min="0" max="100" step="5" value="10">
    </p>
    <p>
        <input type="submit" value="Send">
    </p>
</form>
TIP
- A slider is useless if you can't see which value you have selected
- Use the
outputelement in combination with anoninputattribute on the slider to show the selected value
    <input
        type="range" id="range" name="range"
        min="0" max="5" step=".1" value="2.5"
        oninput="selected.value =  range.value"
    />
    <output id="selected">2.5</output>
1
2
3
4
5
6
2
3
4
5
6
<form action="https://it-fact.be/form.php" method="post">
    <p>
        <label for="range">jQuery knowledge</label>
        <input type="range" id="range" name="range" min="0" max="5" step=".1" value="2.5" oninput="selected.value =
range.value">
        <output id="selected">2.5</output>
    </p>
    <p>
        <input type="submit" value="Send">
    </p>
</form>
# <input type="number">
- Defines a field for entering a number
| attribute | required/optional | description |
|---|---|---|
| min | optional | specifies the minimum value allowed |
| max | optional | specifies the maximum value allowed |
| step | optional | specifies the step size |
| value | optional | specifies the default value |
<form action="https://it-fact.be/form.php" method="post">
    <p>
        <label for="age">Current age</label>
        <input type="number" id="age" name="age" min="17" max="100" step="1" value="18">
    </p>
    <p>
        <input type="submit" value="Send">
    </p>
</form>
# <input type="search">
- Defines a search field (like a site search, or Google search)
- Such search fields are functionally identical to text inputs, but may be styled differently (by the user agent/browser style sheet)
<form action="https://it-fact.be/form.php" method="post">
    <p>
       <label for="query">Popular search term</label>
       <input type="search" id="query" name="query">
    </p>
    <p>
        <input type="submit" value="Send">
    </p>
</form>
# <input type="tel">
- Defines a field for entering a telephone number
- By default no validation
- In our example, we use
pattern="0(\d{2,3}\/\d{6}|\d\/\d{7})"to allow only Belgian landline (02/1234567, 014/123456, ...) and mobile (0475/123456, ...) phone numbers\drepresents a number between 0 and 9
<form action="https://it-fact.be/form.php" method="post">
    <p>
        <label for="tel">Tel</label>
        <input type="tel" id="tel" name="tel" pattern="0(\d{2,3}\/\d{6}|\d\/\d{7})">
    </p>
    <p>
        <input type="submit" value="Send">
    </p>
</form>
# <input type="checkbox">
- Defines a checkbox
- Lets the user select one or more options out of a limited number of choices
| attribute | required/optional | description |
|---|---|---|
| value | optional | specifies the value of the value attribute of a checkbox. The value is not shown to the user, but is sent to the server when the form is submitted (and the checkbox is checked/ticked). |
| checked | optional | if set, the checkbox will be checked |
<form action="https://it-fact.be/form.php" method="post">
    <p>
        <input type="checkbox" id="car" name="mobility1" value="car">
        <label for="car"> I own a car </label>
    </p>
    <p>
        <input type="checkbox" id="bike" name="mobility2" value="bike" checked>
        <label for="bike"> I own a bike </label>
    </p>
    <p>
        <input type="submit" value="Send">
    </p>
</form>
# <input type="radio">
- Defines a radio button
- Radio buttons are normally presented in radio groups (a collection of radio buttons describing a set of related options) that share the same
name(name="driving"in the example) - Only one radio button in a group can be selected at the same time
- You can have multiple radio groups on a page, as long as each group has its own name
- Radio buttons are normally presented in radio groups (a collection of radio buttons describing a set of related options) that share the same
| attribute | required/optional | description |
|---|---|---|
| value | optional | specifies the value of the value attribute of a radio button. The value is not shown to the user, but is sent to the server when the form is submitted (and the radio button is selected/ticked). |
| checked | optional | if set, the radio button will be selected |
<form action="https://it-fact.be/form.php" method="post">
    <p>
        <input type="radio" id="drivinglicense" name="driving" value="yes">
        <label for="drivinglicense">I have a driving license</label>
    </p>
    <p>
        <input type="radio" id="nodrivinglicense" name="driving" value="no" checked>
        <label for="nodrivinglicense">I don't have a driving license</label>
    </p>
    <p>
        <input type="submit" value="Send">
    </p>
</form>
# <input type="submit">
- Defines a submit button which submits all form values to a form handler (in this case our PHP page specified in the
actionattribute)
| attribute | required/optional | description |
|---|---|---|
| value | optional | specifies the text that is displayed on the button |
<form action="https://it-fact.be/form.php" method="post">
    <p>
        <label for="name">Name</label>
        <input type="text" id="name" size="40" maxlength="20" name="name" placeholder="Enter your name" autofocus>
    </p>
    <p>
        <input type="submit" value="Send">
    </p>
</form>
REMARK: <button type="submit">
- If you prefer to work with real
buttonelements (e.g. for styling purposes) you can addtype="submit"to a button - Such a button will have the same behavior as
<input type="submit">
<button type="submit">Send</button>
1
WARNING: default button submits the form
- A button without the
typeattribute will submit the form when clicked - Specify the
type="button"if you want to remove this default behavior- Later on you will probably use JavaScript to listen to the click event of this button and perform an action
<!-- This button will submit the form (when inside form tags) -->
<button>Default button = submit</button>

<!-- This button will do nothing -->
<button type="button">Button with type button</button>
1
2
3
4
5
2
3
4
5
# <input type="reset">
- Defines a reset button which resets all form values to its initial values
| attribute | required/optional | description |
|---|---|---|
| value | optional | specifies the text that is displayed on the button |
<form action="https://it-fact.be/form.php" method="post">
    <p>
        <label for="name">Name</label>
        <input type="text" id="name" size="40" maxlength="20" name="name" placeholder="Enter your name" autofocus>
    </p>
    <p>
        <input type="submit" value="Send">
    </p>
    <p>
        <input type="reset" value="Reset">
    </p>
</form>
REMARK: <button type="reset">
- If you prefer to work with real
buttonelements (e.g. for styling purposes) you can addtype="reset"to a button - Such a button will have the same behavior as
<input type="reset">
<button type="reset">Reset</button>
1
# <input type="button">
- Defines a clickable button (mostly used with JavaScript)
- Doesn't submit the form, unless you code the form submission in the registered click event
<form>
    <input type="button" id="formbutton" value="Click me!">
</form>
<script>
    const btn = document.getElementById("formbutton")
    btn.addEventListener("click", function(){
        alert("You clicked me!");
    });
</script>
# Other form elements
# <textarea></textarea>
- Defines a multi-line text input field
- Often used to collect user inputs like comments or reviews
| attribute | required/optional | description |
|---|---|---|
| rows | optional | specifies the visible number of lines in a textarea |
| cols | optional | specifies the visible width of a textarea |
<form action="https://it-fact.be/form.php" method="post">
    <p>
        <label for="remarks">Remarks:</label>
    </p>
    <p>
        <textarea rows="5" cols="25" id="remarks" name="remarks"></textarea>
    </p>
    <p>
        <input type="submit" value="Send">
    </p>
</form>
# <select></select>
- Creates a (drop-down) list
| attribute | required/optional | description |
|---|---|---|
| size | optional | defines the number of visible options in a (drop-down) list (default = 1 results in a dropdown list) |
# <option></option>
- The
<option>tags inside theselectelement define the available options in the (drop-down) list
| attribute | required/optional | description |
|---|---|---|
| value | optional | specifies the value to be sent to the server (by default, the text of the <option> tag is sent) |
| selected | optional | specifies that an option should be pre-selected when the page loads |
# <optgroup></optgroup>
- Groups related options in a
selectelement- If you have a long list of options, groups of related options are easier to handle for a user
| attribute | required/optional | description |
|---|---|---|
| label | required | specifies the name of the group of options |
<form action="https://it-fact.be/form.php" method="post">
    <p>
        <label for="city">City: </label>
    </p>
    <p>
        <select id="city" name="city" size="3">
            <option value="G">Geel</option>
            <option value="T">Turnhout</option>
            <option value="H">Herentals</option>
            <option value="M" selected>Mol</option>
        </select>
    </p>
    <p>
        <label for="activity">Choose an activity: </label>
    </p>
    <p>
        <select id="activity" size="8" name="activity">
            <optgroup label="Indoor">
                <option value="snk">Snooker</option>
                <option value="drts">Darts</option>
            </optgroup>
            <optgroup label="Outdoor">
                <option value="tennis" selected>Tennis</option>
                <option value="soccer">Soccer</option>
                <option value="geoc">Geocaching</option>
            </optgroup>
        </select>
    </p>
    <p>
        <input type="submit" value="Send">
    </p>
</form>
# <fieldset></fieldset>
- Groups related elements in a form
- Draws a box around the related elements
- Block level element
- The
<legend>tag is used to define a caption for thefieldsetelement
<form action="https://it-fact.be/form.php" method="post">
    <fieldset>
        <legend>Native Belgian</legend>
        <p>
            <input type="radio" id="yes" name="native" value="yes">
            <label for="yes">Yes</label>
        </p>
        <p>
            <input type="radio" id="no" name="native" value="no" checked>
            <label for="no">No</label>
        </p>
    </fieldset>
    <p>
        <input type="submit" value="Send">
    </p>
</form>
# Form validation
- We can validate most user data without relying on JavaScript
- This is achieved by using validation attributes on form elements
| validation attribute | description |
|---|---|
| required | specifies whether a form field needs to be filled in before the form can be submitted |
| minlength | specifies the minimum length of textual data (strings) |
| maxlength | specifies the maximum length of textual data (strings) |
| min | specifies the minimum value of numerical input types |
| max | specifies the maximum value of numerical input types |
| pattern | specifies a regular expression that defines a pattern the entered data needs to follow |
- Pseudo-classes
:validand:invalidare applied when a form element valid is valid or not- You can use these classes to style your elements based on their validation state
IMPORTANT: Client-side AND server-side validation
- The validation through these attributes always happens in the browser (client-side)
- It's easy to remove these attributes (using the developer tools) and still submit the form
- Be sure that later on you always apply server-side validation (e.g. in your PHP code) as well!
TIP: novalidate
- If you want to quickly test if a form value is sent correctly you can add the
novalidateattribute on theformelement - This will disable all form validations (required,min,max, ...) when submitting the form - Make sure to remove this attribute when you're done testing!
# The sample form styled
<section id="form">
    <form action="https://it-fact.be/form.php" method="post">
        <h1>Register</h1>
        <p>
            <label for="name">Name<sup>*</sup></label>
            <input id="name" size="40" maxlength="20" name="name" placeholder="Enter your name" autofocus required>
        </p>
        <p>
            <label for="password">Password</label>
            <input type="password" id="password" size="15" maxlength="20" name="paswoord" value="test">
        </p>
        <p>
            <input type="hidden" name="userid" value="-1">
        </p>
        <p>
            <label for="url">Website</label>
            <input type="url" id="url" name="url" placeholder="your website url">
        </p>
        <p>
            <label for="zip">Zip code</label>
            <input type="text" id="zip" name="zip" pattern="[0-9]{4}">
        </p>
        <p>
            <label for="email">Email<sup>*</sup></label>
            <input type="email" id="email" name="email" required>
        </p>
        <p>
            <label for="range">jQuery knowledge
                 (<output id="jquery">10</output>%)
            </label>
            <input type="range" id="range" name="range" min="0" max="100" step="5" value="10"
                oninput="jquery.value = range.value">
        </p>
        <p>
            <label for="age">Current age</label>
            <input type="number" id="age" name="age" min="17" max="100" step="1" value="18">
        </p>
        <p>
            <label for="query">Popular search term</label>
        </p>
        <p>
            <label for="tel">Tel</label>
            <input type="tel" id="tel" name="tel">
        </p>
        <p>
            <label for="tel2">Tel 2<sup>*</sup></label>
            <input type="tel" id="tel2" name="tel2" pattern="0(\d{2,3}\/\d{6}|\d\/\d{7})" required>
        </p>
        <p class="sameline">
            <input type="checkbox" id="car" name="mobility1" value="car">
            <label for="car"> I own a car</label>
        </p>
        <p class="sameline">
            <input type="checkbox" id="bike" name="mobility2" value="bike" checked>
            <label for="bike"> I own a bike </label>
        </p>
        <p class="sameline">
            <input type="radio" id="drivinglicense" name="driving" value="ja">
            <label for="drivinglicense">I have a driving license</label>
        </p>
        <p class="sameline">
            <input type="radio" id="nodrivinglicense" name="driving" value="neen" checked>
            <label for="nodrivinglicense">I don't have a driving license</label>
       <p>
            <label for="remarks">Remarks:</label>
        </p>
        <p>
            <textarea rows="5" cols="25" id="remarks" name="remarks"></textarea>
        </p>
        <p>
            <label for="city">City: </label>
        </p>
        <p>
            <select id="city" name="city" size="3">
                <option value="G">Geel</option>
                <option value="T">Turnhout</option>
                <option value="H">Herentals</option>
                <option value="M" selected>Mol</option>
            </select>
        </p>
        <p>
            <label for="activity">Choose an activity: </label>
        </p>
        <p>
            <select id="activity" size="8" name="activity">
                <optgroup label="Indoor">
                    <option value="snk">Snooker</option>
                    <option value="drts">Darts</option>
                </optgroup>
                <optgroup label="Outdoor">
                    <option value="tennis" selected>Tennis</option>
                    <option value="soccer">Soccer</option>
                    <option value="geoc">Geocaching</option>
                </optgroup>
            </select>
        </p>
        <fieldset>
            <legend>Native Belgian</legend>
            <p class="sameline">
                <input type="radio" id="yes" name="native" value="yes">
                <label for="yes">Yes</label>
            </p>
            <p class="sameline">
                <input type="radio" id="no" name="native" value="no" checked>
                <label for="no">No</label>
            </p>
        </fieldset>
        <div class="sameline">
            <p>
                <input type="submit" value="Send">
            </p>
            <p>
                <input type="reset" value="Reset">
            </p>
        </div>
    </form>
</section>
* {
    margin: 0;
    padding: 0;
    box-sizing: border-box;
}

html {
    font-size: 16px;
}

body {
    font-family: 'Roboto', sans-serif;
}

h1 {
    margin-bottom: 1.5rem;
}

#form {
    max-width: 700px;
    margin: auto;
    padding: 0.5rem;
}

label {
    display: block;
    margin-bottom: .5rem;
}

input, textarea {
    display: block;
    padding: .375rem .75rem;
    border: 1px solid #ced4da;
    border-radius: .25rem;
    margin-bottom: 1rem;
    width: 100%;
}

select, textarea, fieldset {
    margin-bottom: 1rem;
}

input:focus, textarea:focus, select:focus {
    outline: none;
    box-shadow: 0 0 5px 3px lightskyblue;
}

input[type="range"] {
    padding-left: 0;
    padding-right: 0;
}

input[type="range"]:focus {
    box-shadow: none
}

input:invalid {
    border-color: #dc3545;
    background-image: url("data:image/svg+xml,%3csvg xmlns='http://www.w3.org/2000/svg' viewBox='0 0 12 12' width='12' height='12' fill='none' stroke='%23dc3545'%3e%3ccircle cx='6' cy='6' r='4.5'/%3e%3cpath stroke-linejoin='round' d='M5.8 3.6h.4L6 6.5z'/%3e%3ccircle cx='6' cy='8.2' r='.6' fill='%23dc3545' stroke='none'/%3e%3c/svg%3e");
    background-repeat: no-repeat;
    background-position: right calc(.375em + .1875rem) center;
    background-size: calc(.75em + .375rem) calc(.75em + .375rem);
}

input:valid {
    border-color: #198754;
    background-image:url("data:image/svg+xml,%3csvg xmlns='http://www.w3.org/2000/svg' viewBox='0 0 8 8'%3e%3cpath fill='%23198754' d='M2.3 6.73L.6 4.53c-.4-1.04.46-1.4 1.1-.8l1.1 1.4 3.4-3.8c.6-.63 1.6-.27 1.2.7l-4 4.6c-.43.5-.8.4-1.1.1z'/%3e%3c/svg%3e");
    background-repeat: no-repeat;
    background-position: right calc(.375em + .1875rem) center;
    background-size: calc(.75em + .375rem) calc(.75em + .375rem);
}

input[type="date"],
input[type="number"],
input[type="submit"],
input[type="radio"],
input[type="checkbox"] {
    width: auto;
    margin-right: .35rem;
    background: none;
}

input[type="submit"] {
    color: #fff;
    background-color: #0d6efd;
    border-color: #0d6efd;
    padding: .375rem .75rem;
    cursor: pointer;
    font-size: 1rem;
    margin-top: 2rem;
}

input[type="submit"]:hover {
    background-color: darkblue;
}

input[type="reset"] {
    color: #fff;
    background-color: orange;
    border-color: orange;
    padding: .375rem .75rem;
    cursor: pointer;
    font-size: 1rem;
    margin-top: 2rem;
}

input[type="reset"]:hover {
    background-color: red;
}

.sameline {
    display: flex;
}

fieldset {
    padding: .75rem;
}
'Roboto'font (Google Fonts)- Basic styling for inputs
- Padding & margin
- Rounded border
- 100% width
- All labels and inputs are displayed as block level elements
- Except for the checkboxes and radiobuttons: class
sameline=>display: flex
- Except for the checkboxes and radiobuttons: class
- Extra styling for
:valid,:invalidand:focuspseudo-classes - Different styling for
submitandresetinput (button) using attribute selectors - ...