# Netlify hosting
- Netlify (opens new window) is a (free) webhosting service for static websites
- Netlify makes it super easy for developers to deploy and host a website securely
- Netlify has built-in DNS management and free SSL certificates
- You can fully automate your deployment process with GitHub: Netlify continuously monitors your (main) branch and deploys a new version every time this branch is changed
TIPS
- You can use Netlify for every static website that you make during the next years (e.g. Angular course, React course, personal projects, ...)
- Netlify is also interesting for your graduation portfolio at the end of your studies at Thomas More
- With the free version (opens new window) you get:
- unlimited websites
- 100GB bandwidth each month
- 300 build minutes each month
- 100 form submissions per site per month
# Create an SSH key and add it to GitHub
- First, you need to create an SSH key on your computer and add it to your GitHub account
# Create an SSH key
- you need to add an SSH key to your GitHub account
- Go the start menu and open Git GUI
- Go to the Help menu and click on Show SSH key
- Only if you don't see anything in the text field:
- Click on Generate Key
- Click on Copy to clipboard
- Close the window
# Add the SSH key to GitHub
- Go to your GitHub account and click on your profile picture in the top right corner
- Click on Settings
- Click on SSH and GPG keys
- Click on New SSH key
- Paste the SSH key in the Key field, add a title (e.g. My Laptop) and click on Add SSH key
TIP
This video shows the complete process you need to go through:
Creating SSH key using Git GUI for windows git command line (opens new window)
# Setup a GitHub repo with content
REMARK
- To demonstrate how Netlify hosting works we will use your Expect MORE food website
- Create a new (private) repo, e.g. expect_more_food
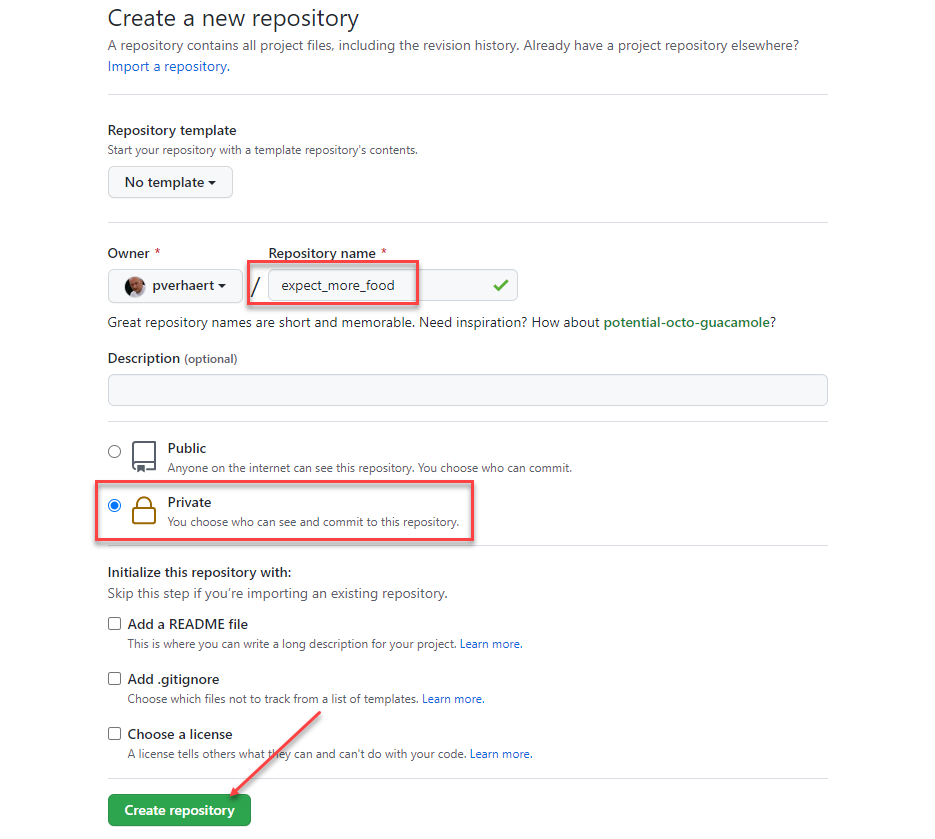
- Open the project folder in PhpStorm
- Add the following files to the root of your project
- README.md
# expect_more_food1 - .gitignore
.DS_Store
.idea/
1
2
- README.md
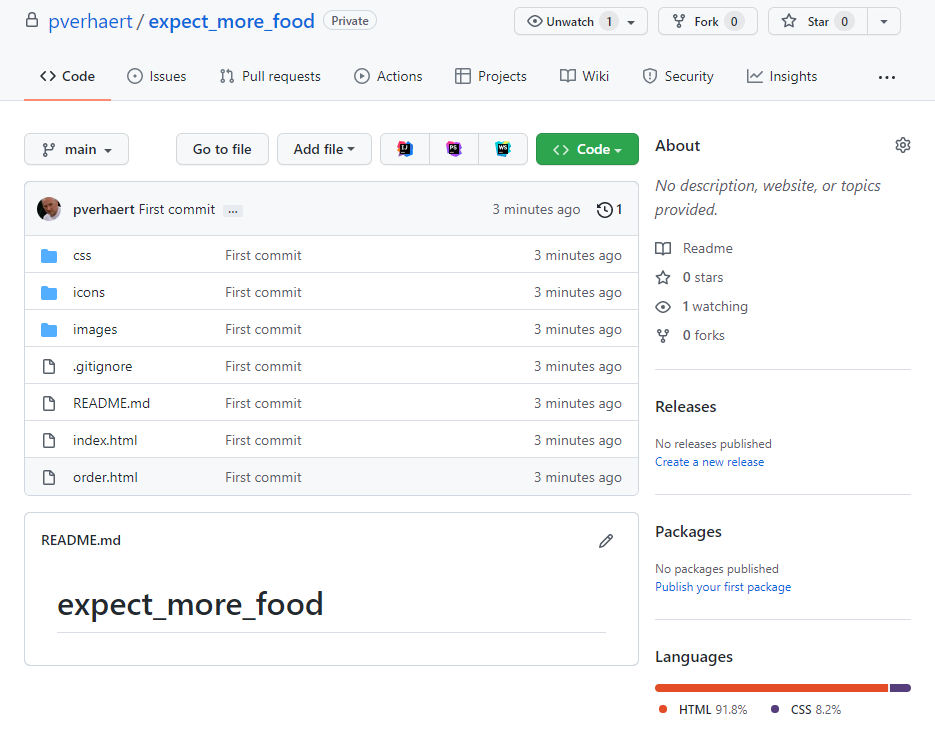
- Open a terminal (in PhpStorm), setup your repo and add/commit all the files:
git init
git add .
git commit -m "First commit"
1
2
3
2
3
- Copy the script from GitHub and paste it in the terminal

- Refresh your GitHub page
# Setup Netlify hosting
- Go to netlify.com (opens new window) and Sign up with your GitHub account
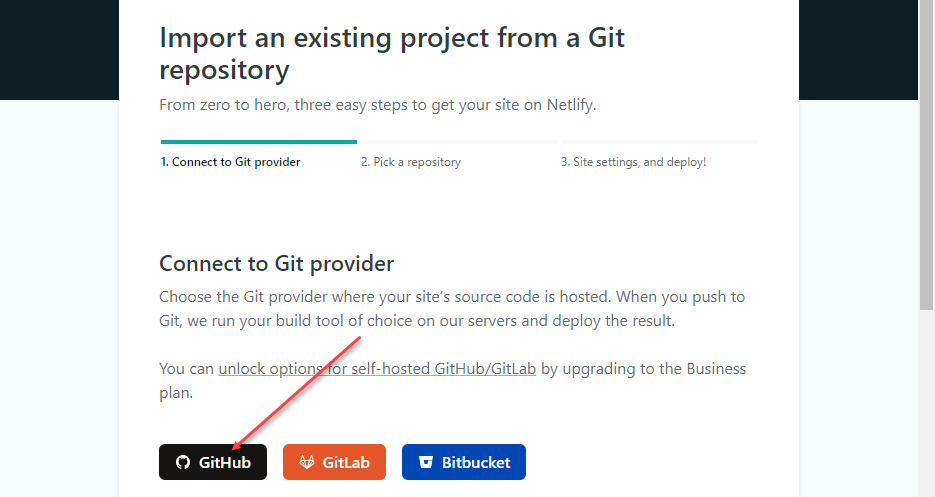
- Go to Sites and create a Add a new site (Import an existing project)
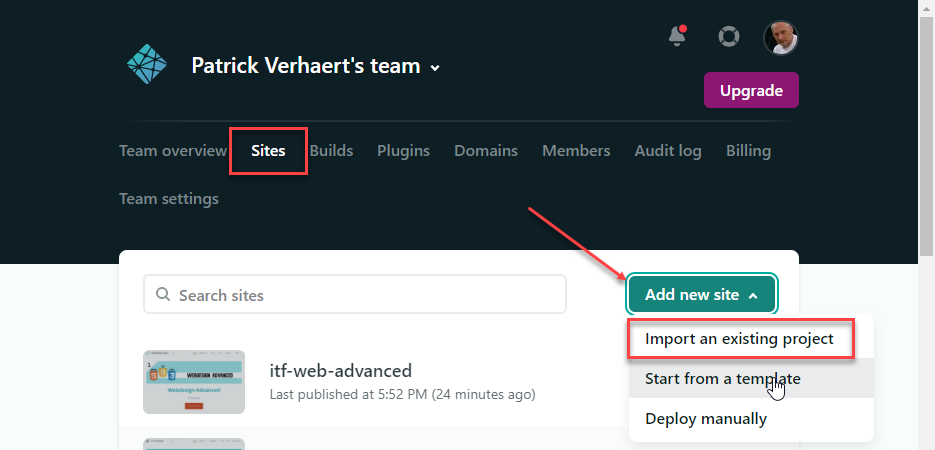
- Choose GitHub as your Git provider
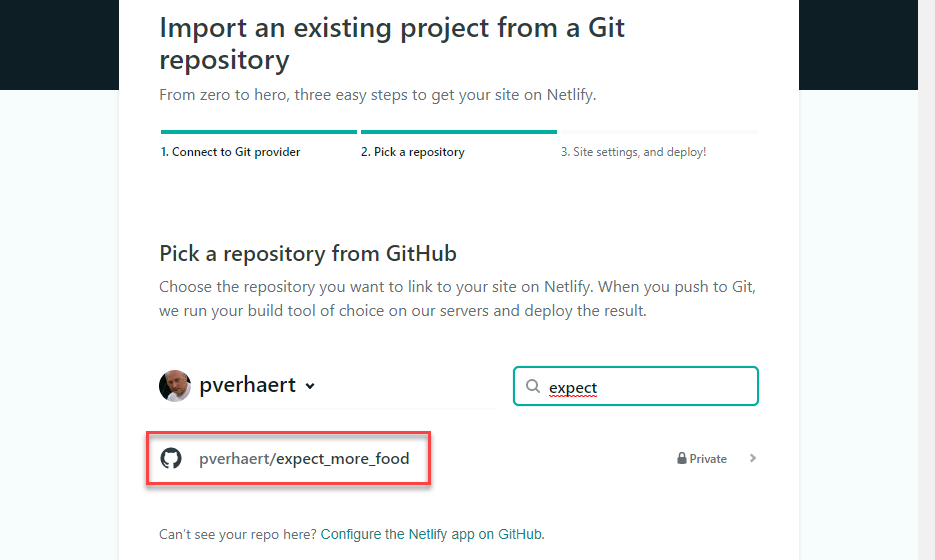
- Search for the expect_more_food repo and click on its name
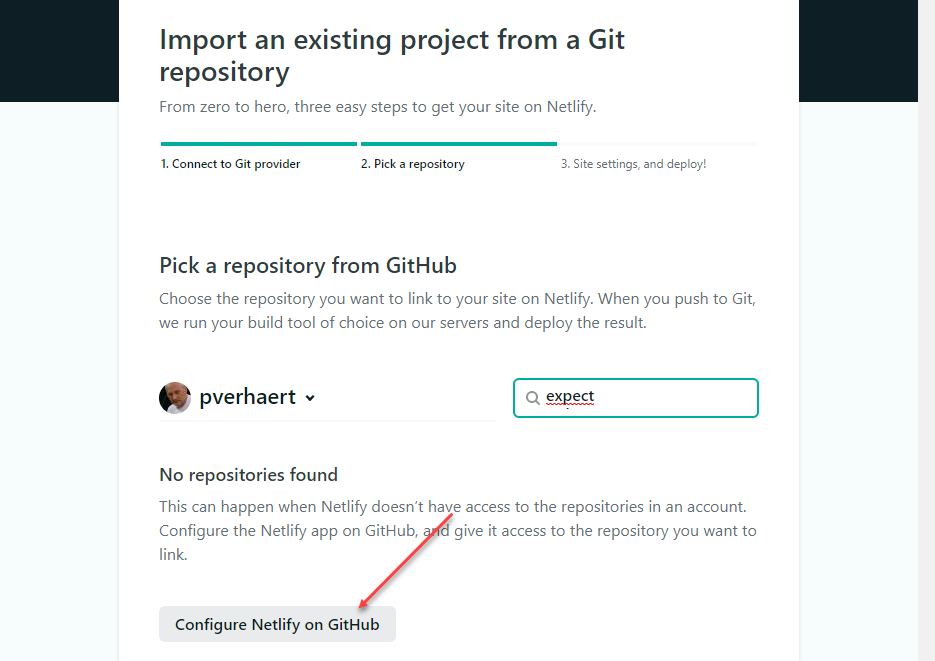
REMARK
Click on Configure Netlify on GitHub if Netlify can't find your repo(s)
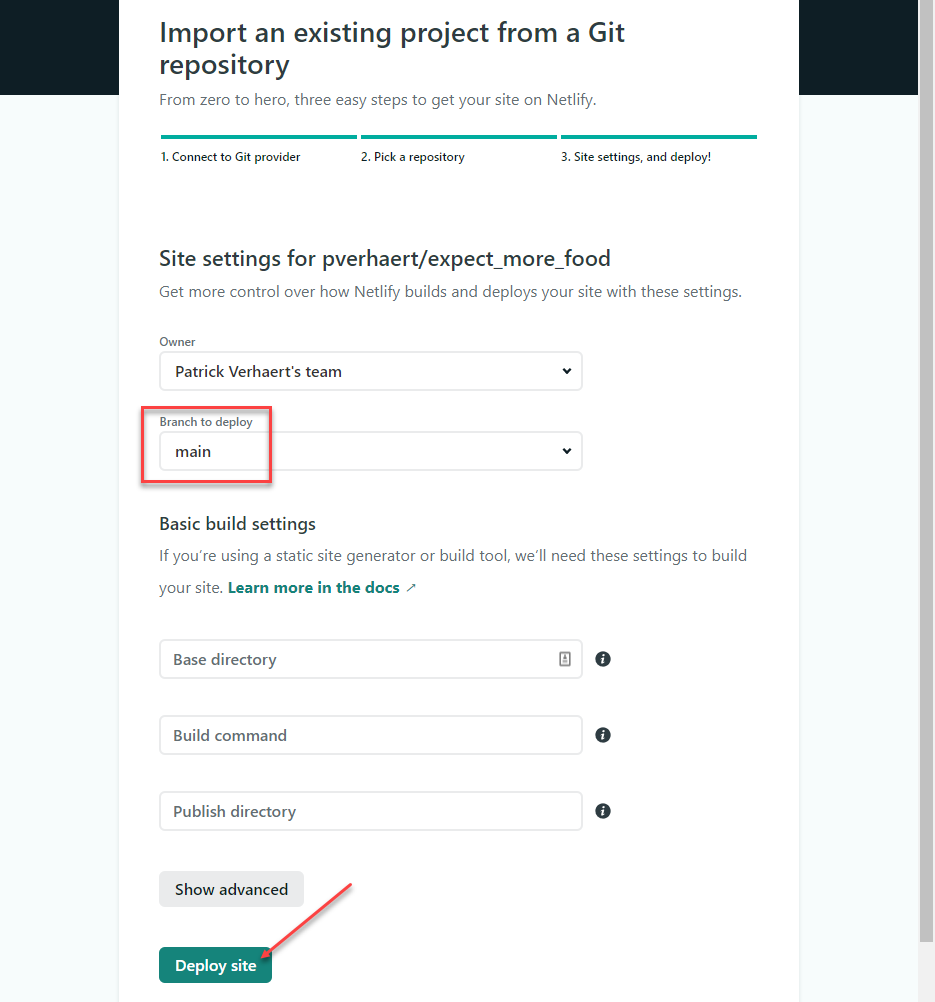
- Update your deployment settings:
- Branch to deploy: main (this is selected by default because we only have one branch)
- Click on Deploy site
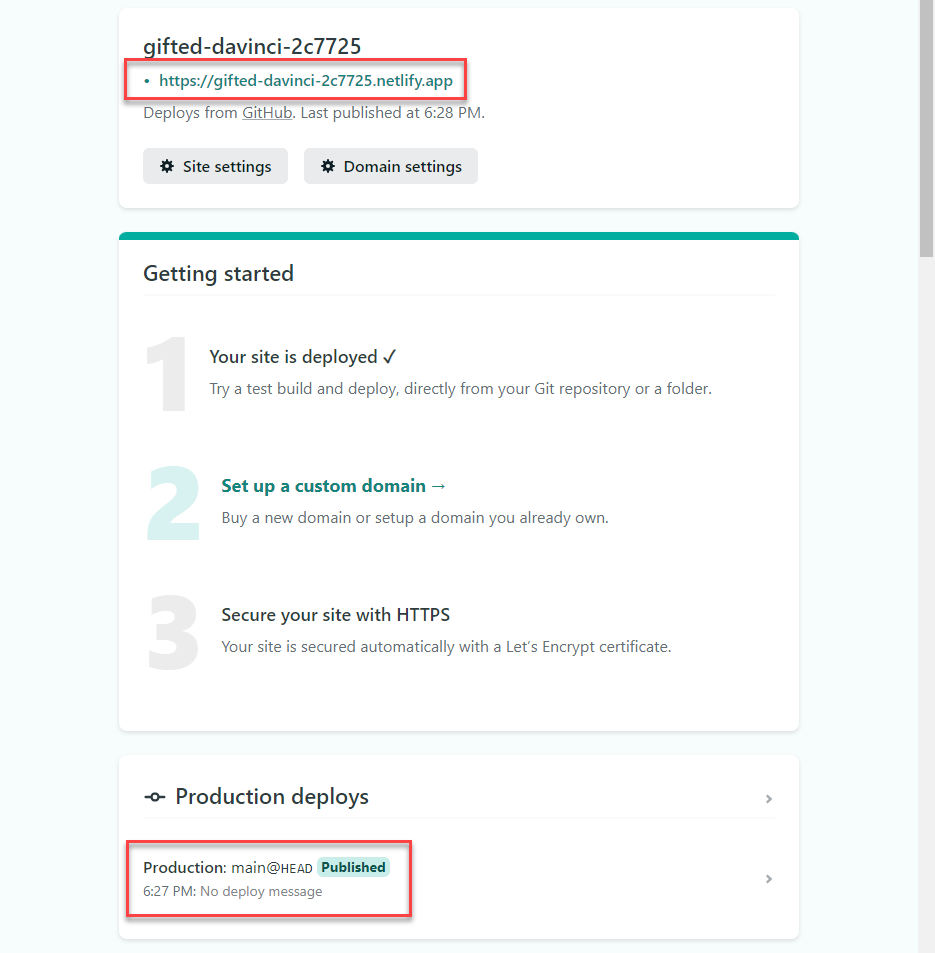
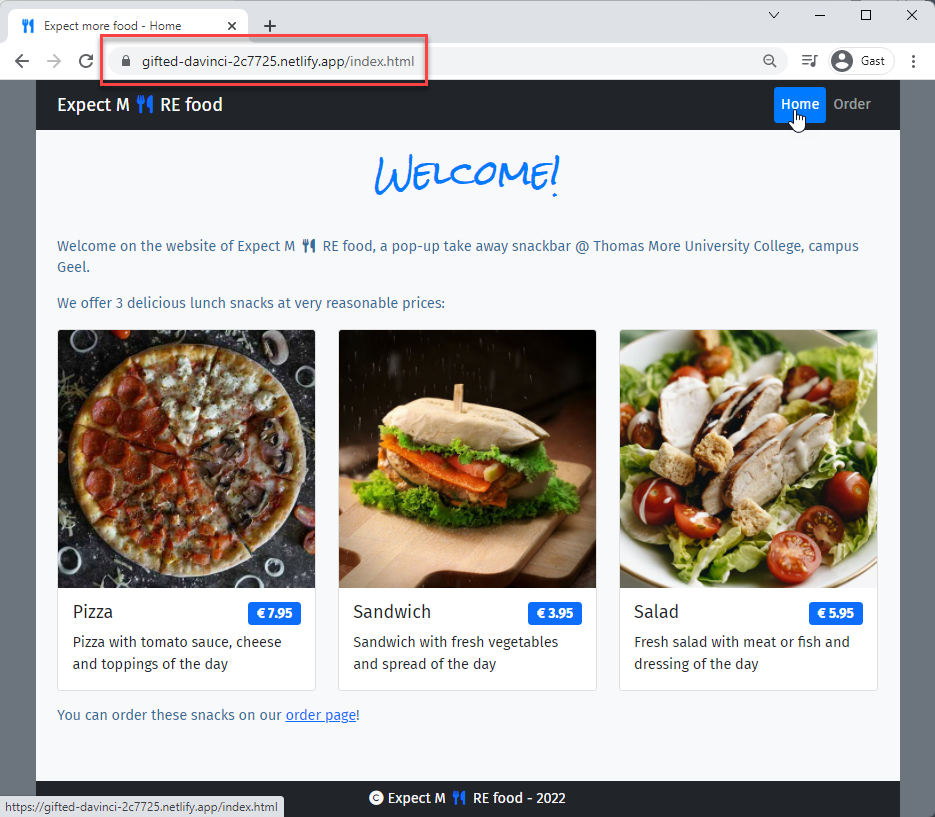
- CONGRATULATIONS: your website is now online!
- Netlify created a random subdomain for your site
- Click on the URL to visit your site
REMARKS
- From now on: every time you push your changes to the main branch, Netlify will automatically update your site!
- Unfortunately, email notifications of successful site updates are no (longer) part of the free starter plan
- Use Zapier (opens new window) to handle this task (OPTIONAL)
- Sign up to Zapier
- Try out the Zap "Netlify -> Email by Zapier" (opens new window)
- The configuration of this Zap is rather straightforward, as illustrated in the screenshot video below
# Custom subdomain
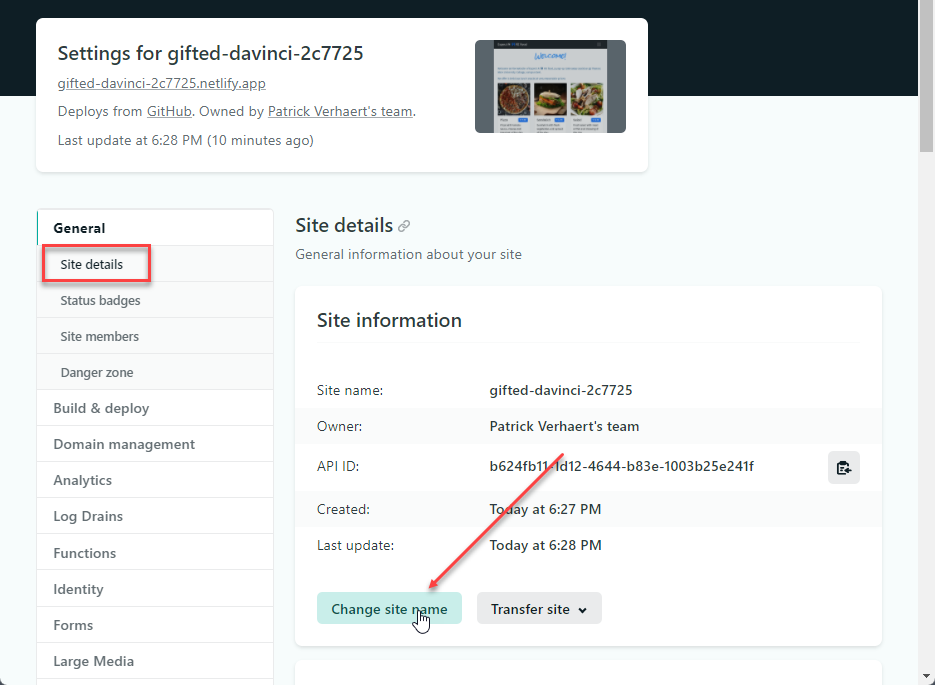
- Click on Site settings to configure your hosting
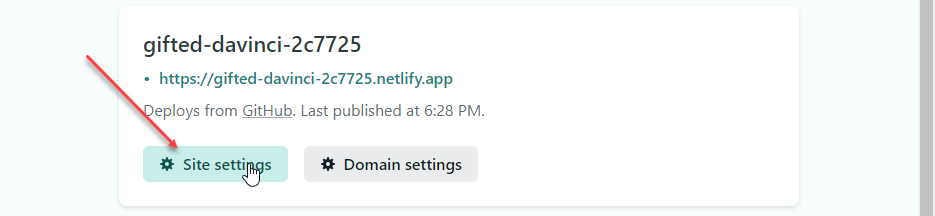
- Under Site details you can Change the site name to a more suitable name (if it is still available of course)
# Custom 404 error page
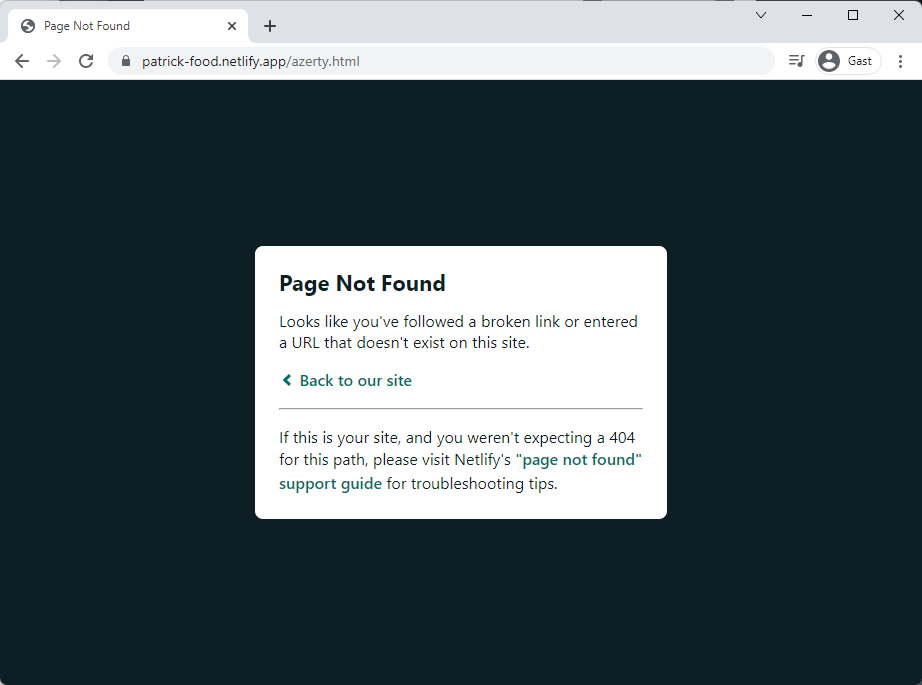
- When you access a non-existing page on your website, Netlify serves a default 404 error page with this pop-up:
- To make a custom error page, create a new HTML file 404.html at the root of your site
REMARK
PhpStorm will immediately ask you to add this file to Git:
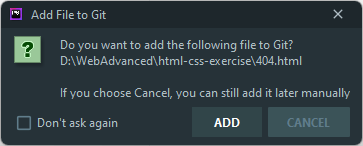
Choose Cancel, as the Git integration within PhpStorm is beyond the scope of this course and we will add our (new and changed) files using the git add . command later on
- Paste the following code in the HTML file:
<!DOCTYPE html>
<html lang="en">
<head>
    <meta charset="UTF-8">
    <meta name="viewport" content="width=device-width, initial-scale=1.0"/>
    <title>Error 404</title>
    <link rel="stylesheet" href="/css/errorpage.css"/>
</head>
<body>
<main>
    <h1>OOPS!</h1>
    <h2>404 - The Page can't be found</h2>
</main>
</body>
</html>
1
2
3
4
5
6
7
8
9
10
11
12
13
14
15
2
3
4
5
6
7
8
9
10
11
12
13
14
15
- Of course, it is possible to link a stylesheet to your error page to make it more appealing
- Create a new CSS file errorpage.css in the folder css
- Paste the following code in the CSS file:
@import url('https://fonts.googleapis.com/css2?family=Montserrat:wght@200;400');

* {
    padding: 0;
    margin: 0;
    box-sizing: border-box;
}

html {
    font-size: 16px;
}

body {
    font-family: 'Montserrat', sans-serif;
    background-color: #f3c8c8;
    color: #992727;
    height: 100vh;
    display: flex;
    align-items: center;
    justify-content: center;
    text-align: center;
}

h1 {
    font-size: 6rem;
    font-weight: 200;
}

h2 {
    font-size: .8rem;
    font-weight: 400;
    display: inline-block;
    padding: .5rem;
    background-color: #f3c8c8;
    transform: translateY(-2.5rem);
}

@media screen and (min-width: 480px) {
    h1 {
        font-size: 9rem;
    }

    h2 {
        font-size: 1.5rem;
        transform: translateY(-4rem);
    }
}

@media screen and (min-width: 800px) {
    h1 {
        font-size: 15rem;
    }

    h2 {
        font-size: 2.2rem;
        transform: translateY(-6rem);
    }
}
1
2
3
4
5
6
7
8
9
10
11
12
13
14
15
16
17
18
19
20
21
22
23
24
25
26
27
28
29
30
31
32
33
34
35
36
37
38
39
40
41
42
43
44
45
46
47
48
49
50
51
52
53
54
55
56
57
58
2
3
4
5
6
7
8
9
10
11
12
13
14
15
16
17
18
19
20
21
22
23
24
25
26
27
28
29
30
31
32
33
34
35
36
37
38
39
40
41
42
43
44
45
46
47
48
49
50
51
52
53
54
55
56
57
58
- Push your changes to GitHub
git add .
git commit -m "Add custom 404 error page"
git push
1
2
3
2
3
REMARKS: css/errorpage.css
- Try to understand how everything is positioned (
relative,absolute,transform, ...) - Note that the link to this CSS page (in 404.html) is preceded by a forward slash (
/):
<link rel="stylesheet" href="/css/errorpage.css"/>- When the user tries to view a (non-existing) file in a subfolder, for example
https://<subdomain>.netlify.app/images/pizzo.jpg, the error page is called from that subfolder (and the linked stylesheet is also searched for starting from that subfolder images). So make sure that it is clearly described (in the version you put online) where this CSS file is located, starting from the root (/)!
- When the user tries to view a (non-existing) file in a subfolder, for example
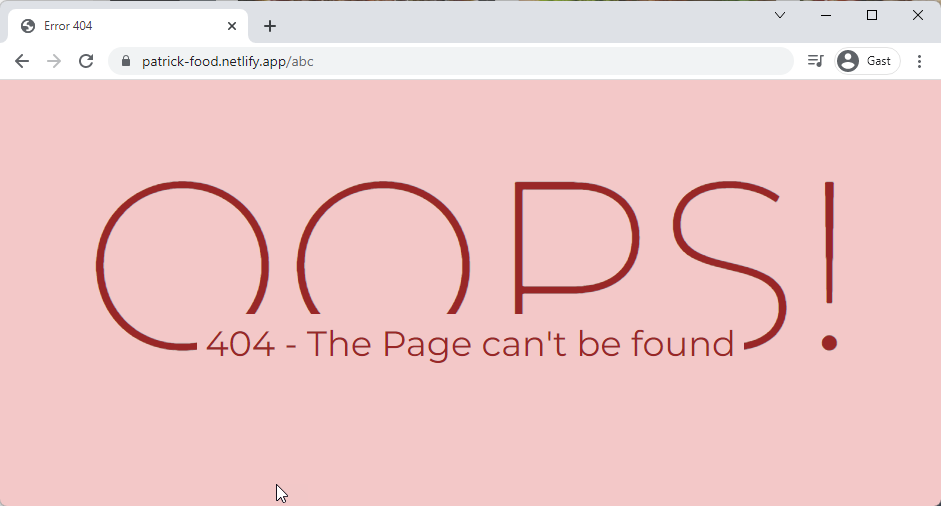
- Test your custom 404 error page by visiting a non-existing page or folder, e.g.
https://<subdomain>.netlify.app/abc
REMARK: .htaccess
- When publishing your website on Sinners (opens new window) (or another Apache-based webserver) you have to manually configure which HTML file should be shown when there is a 404 error
- You configure this in an .htaccess file, which lives in the root of your website folder
- You can generate such an .htaccess file using this online .htaccess Generator (opens new window)
- A simple example of an .htaccess file with a custom 404 error page:
Options All -Indexes
ErrorDocument 404 /404.html
1
2- The first line (
Options All -Indexes) prevents directory listing (i.e. displaying the content of a folder if there is no index.html file present), something that Netlify takes care of by (also) showing the 404 error page
- The first line (
# Form submission using Netlify (OPTIONAL)
- In the Expect MORE food exercise we submit the form to our generic PHP page on it-fact.be
- It is also possible to let Netlify handle the form submission and even get notified on every new submission (email, Slack, webhooks, ...)
- With a little modification to the
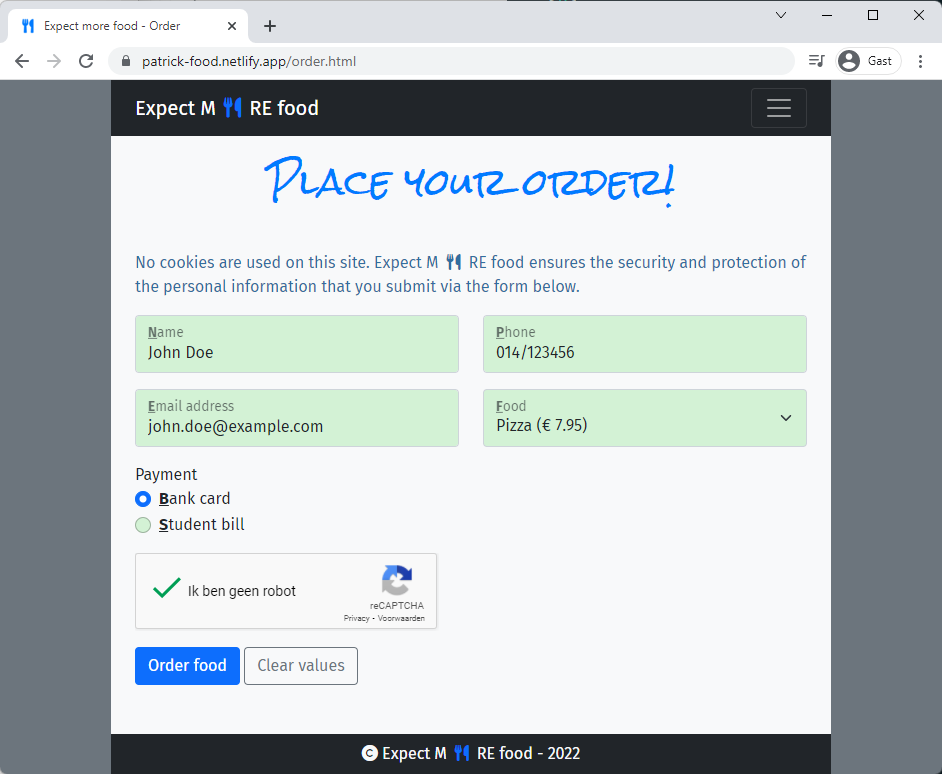
formelement, you can tell Netlify to handle the form submission (opens new window) for us - Open order.html and make the following changes:
- Empty the
actionattribute in the<form>tag and adddata-netlify="true"to the<form>tag to tell Netlify to process the form for us - Optionally:
- Add a
nameattribute that determines how the form will be called in the Netlify site overview - Add
data-netlify-recaptcha="true"to add a spam filter on the form and add, somewhere in your form, the reCAPTCHA field (an emptydivelement with adata-netlify-recaptcha="true"attribute)
- Add a
- Empty the
<form action="" method="post"
    data-netlify="true"
    name="expect-more-food-form"
    data-netlify-recaptcha="true">

    ...

    <div class="my-2">
        <div data-netlify-recaptcha="true"></div>
    </div>

    ...

</form>
1
2
3
4
5
6
7
8
9
10
11
12
13
14
2
3
4
5
6
7
8
9
10
11
12
13
14
- Push your changes to GitHub
git add .
git commit -m "Add Netlify form submission"
git push
1
2
3
2
3
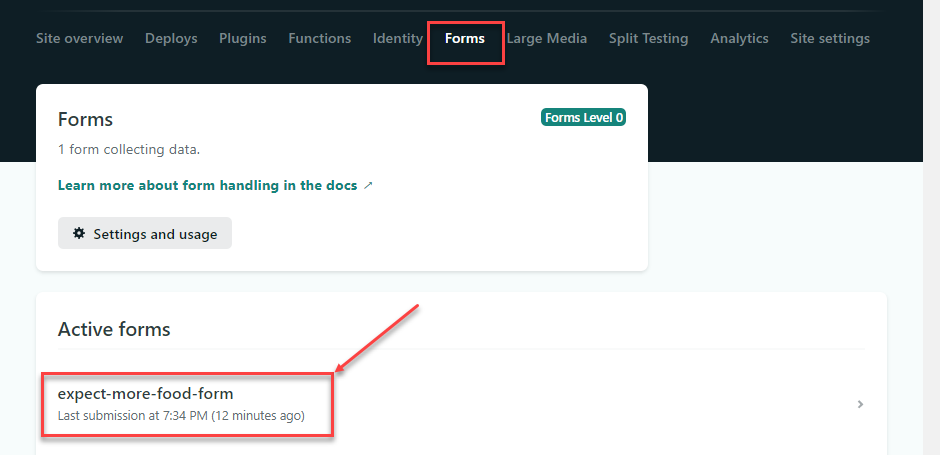
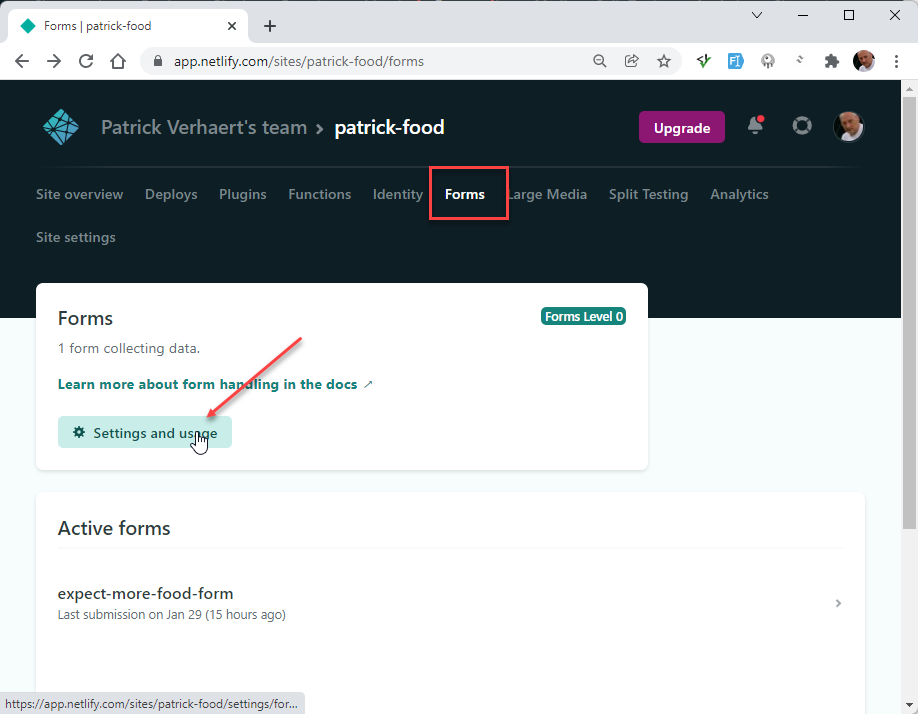
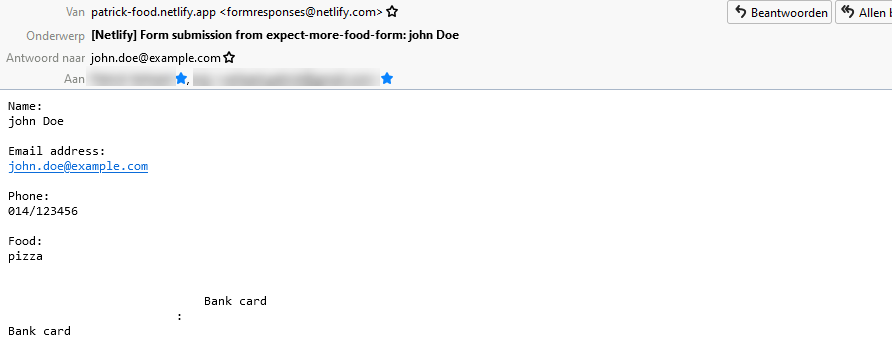
- Test your online form
- You can find the submitted information at the bottom of your site's dashboard or under the forms tab
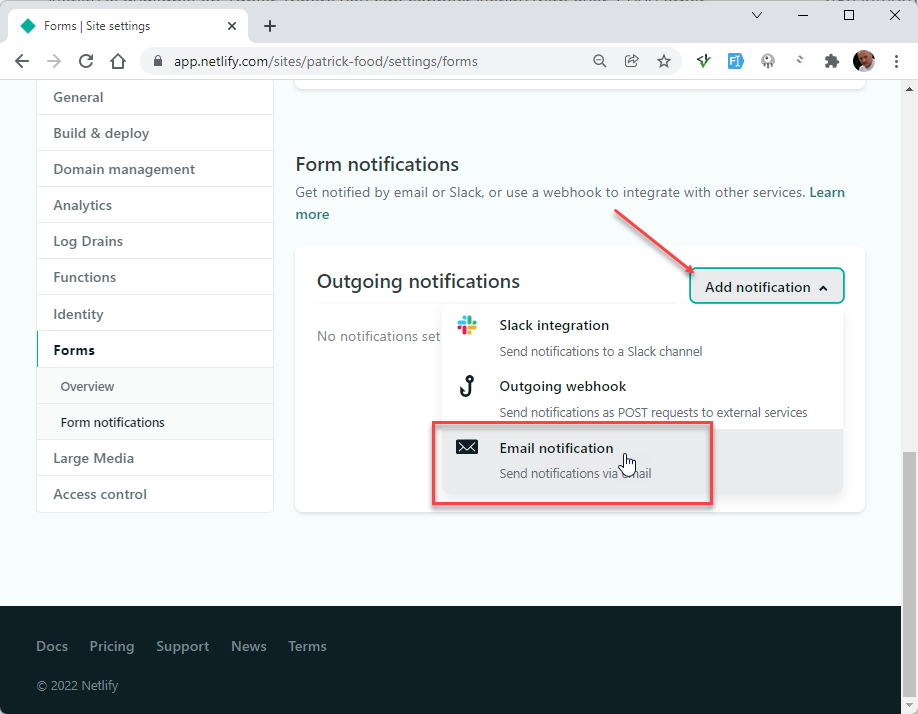
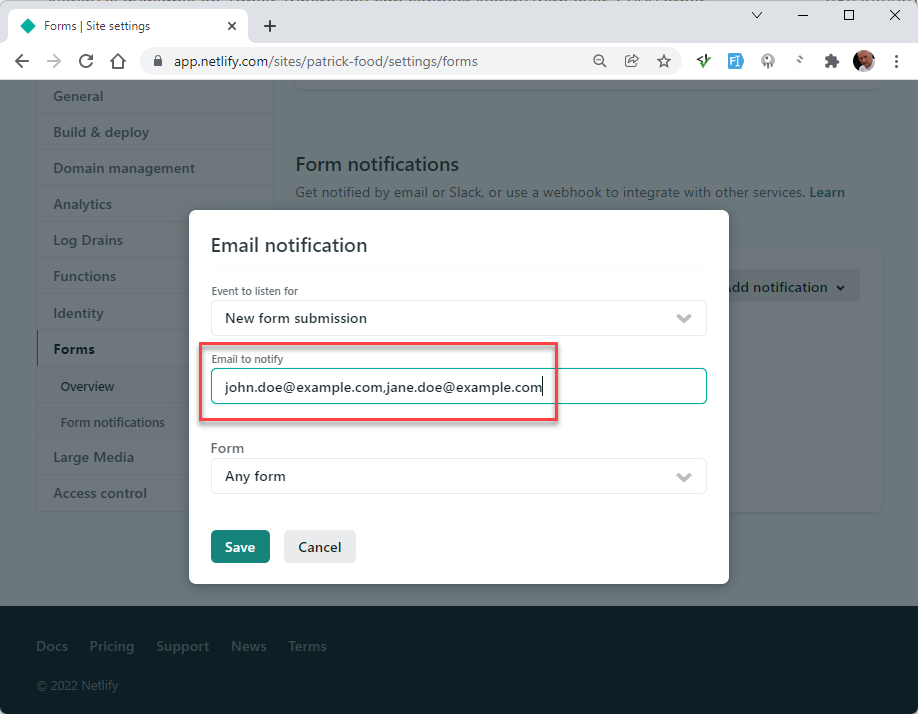
# Send the contact-form to your mailbox
- To send the processed form straight to your mailbox:
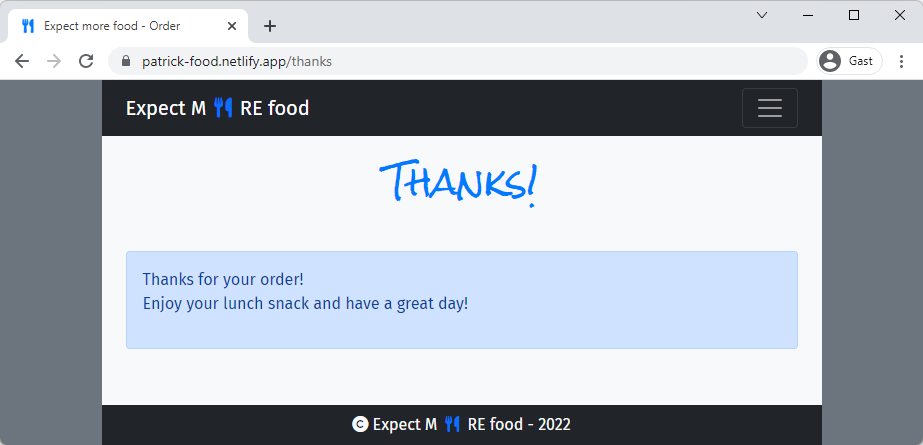
# Custom success page
- When submitting the form, the user gets a default success message as a pop-up on the form page itself:

- You can use a custom success page by adding an
actionattribute (e.g.action="/thanks.html") to the form- The
actionattribute should contain an absolute path (path that starts with/) to work properly
- The
<form action="/thanks.html" method="post"
    data-netlify="true"
    name="expect-more-food-form"
    data-netlify-recaptcha="true">
    ...
</form>
1
2
3
4
5
6
2
3
4
5
6
- Push your changes to GitHub
git add .
git commit -m "Add custom success page"
git push
1
2
3
2
3
- Test your online form again