# Git (advanced)
# Setup
- We assume that your Git-related "setup", as explained in Webdesign Essentials > Git(Hub) (opens new window), is still in order
- you installed a recent version of the Git software for windows (opens new window)
- you have an educational account on GitHub (opens new window)
- you configured Git (user.name, user.email) correctly on all your devices
# Recapitulation
- If version control is applied to a project, you have an online repo(sitory) on Github and a local repo(sitory) on your pc
- You can start from a local project on your pc, make it a local repo and connect it to a new GitHub repo (see Netlify hosting > Setup a GitHub repo with content)
- You start by cloning (
git clone) an existing GitHub repo (to which you're added/invited as a collaborator) to your pc (see e.g. your repo of Webdesign Essentials)
REMARK: private vs. public
- Private repositories are only accessible to the owner and the collaborators
- Unless you want to share your work with the rest of the world, we advise you to keep your repo's private!
- Public repositories are accessible to everyone on the internet
- Examples: Bootstrap (opens new window), sass-bs-example (opens new window) of this course, ...
- So far, you used the basic/centralized Git workflow:
- After you have written some code, you transfer it to the online repo by using the sequence of commands
git add-git commit-git push - You used
git pullto update your local repo to the latest published version on GitHub (e.g. when your teacher added content to the repo)
- After you have written some code, you transfer it to the online repo by using the sequence of commands
# .gitignore
- In the root of a project/repo
- Contains a list of files/folders that should not be tracked/included in the repository
- Example: .gitignore of sass-bs-example (opens new window)
.DS_Store
.idea
.vscode
node_modules
dist/js
dist/css
1
2
3
4
5
6- Line 1: .DS_Store (a file in every macOS folder containing the user's view preferences) is added for macOS users
- Line 2: .idea is the folder containing the user's PhpStorm configuration of this project
- Line 3: .vscode is the folder containing the user's Visual Studio Code configuration of this project
- Line 4: the folder node_modules can be easily reconstructed by
npm install - Line 5: the Bootstrap JavaScript file can be copied from the node_modules folder (by
gulp copy-js) - Line 6: the CSS file(s) can be (re)compiled from the Sass code (using
gulp sass)
# README.md
- In the root of a project/repo
- Contains important information about your project
- What the project does
- Why the project is useful
- How the project can be used
- ...
- Appears on the GitHub "home page" of the repository
- Written in markdown (.md) format
- Example: README.md of sass-bs-example (opens new window)
# sass-bs-example

Sass Bootstrap example of the course [Webdesign Advanced](https://itf-web-advanced.netlify.app/),
1 IT Factory, Thomas More kempen

## Requirements

- [Node](https://nodejs.org/en/)
- [Git](https://git-scm.com/)
- [gulp-cli](https://gulpjs.com/): `npm install -g gulp-cli`

## Start this project

1. Clone (or download) this repo
2. Open the folder _sass-bs-example_
3. Delete the _.git_ folder
4. Install the Node modules: `npm install`
5. Start the default Gulp task: `gulp`
1
2
3
4
5
6
7
8
9
10
11
12
13
14
15
16
17
18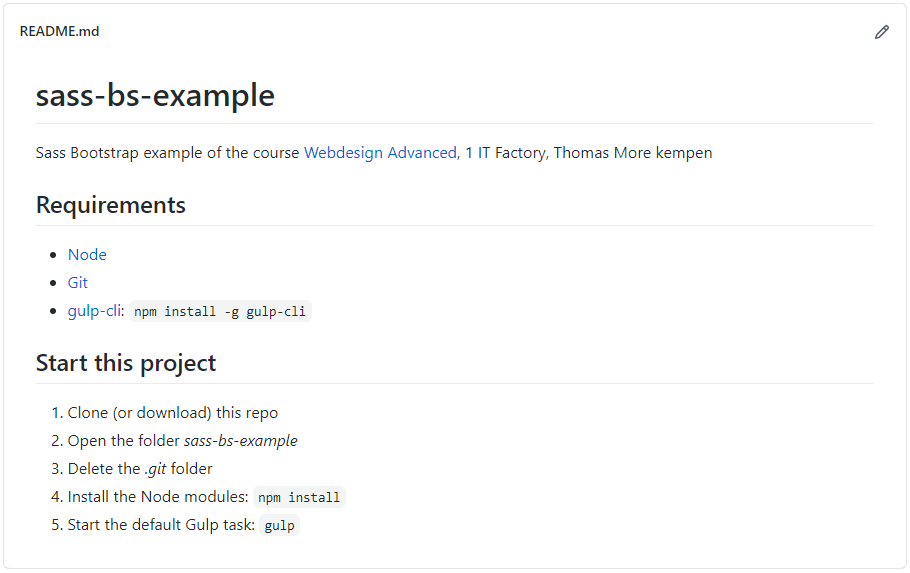
READING TIPS: markdown format
# .git folder
- The .git folder contains all the information that is necessary for your project in version control
- Remote/GitHub repository address
- Commits
- Commit history
- Branches
- ...
- Do NOT remove this folder!
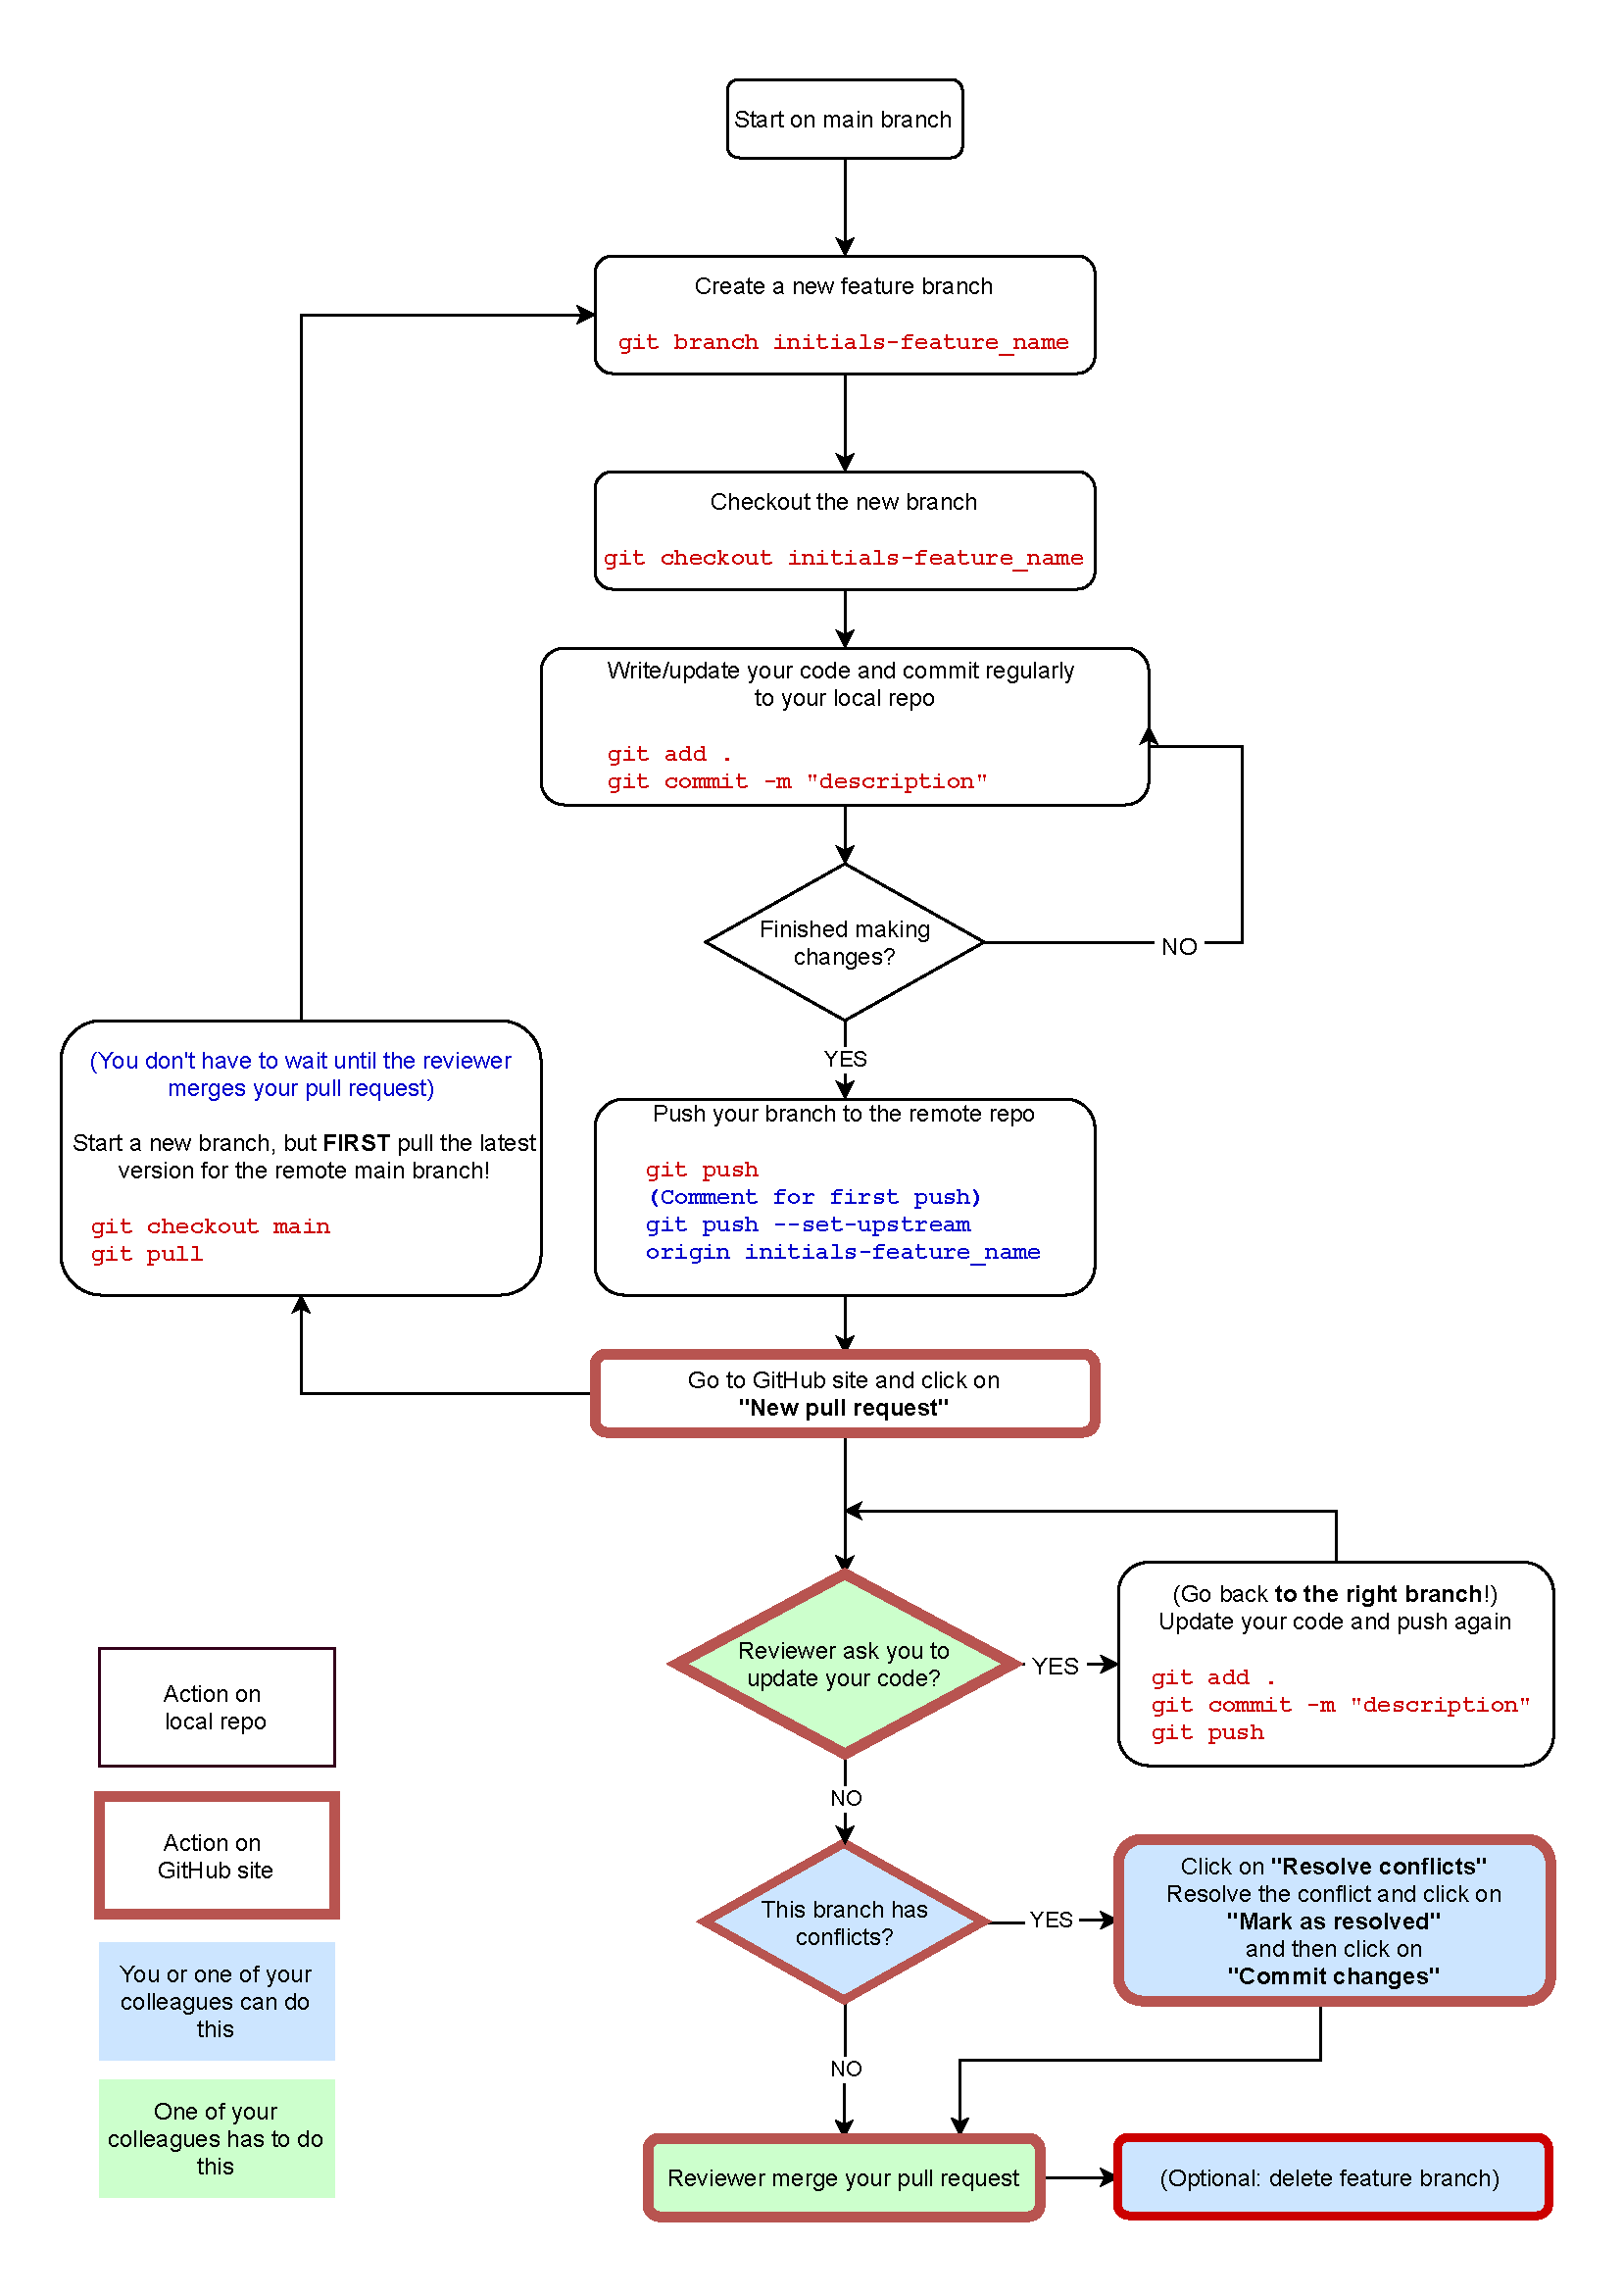
# Feature branch workflow
REMARK
GitHub recently (from October 1, 2020 on) renamed the default branch (opens new window) from master to main. Consequently, the term master branch still (frequently)
occurs in
documentation you find online.
- The basic (or centralized) workflow only uses one/the default
mainbranch resulting in a lot of disadvantages, especially when working in a (large) team on a (large) project- You can't release urgent changes because of an incomplete feature
- Your code is not reviewed by team members leading to more bugs
- You tend to have more (complex) merge conflicts
- ...
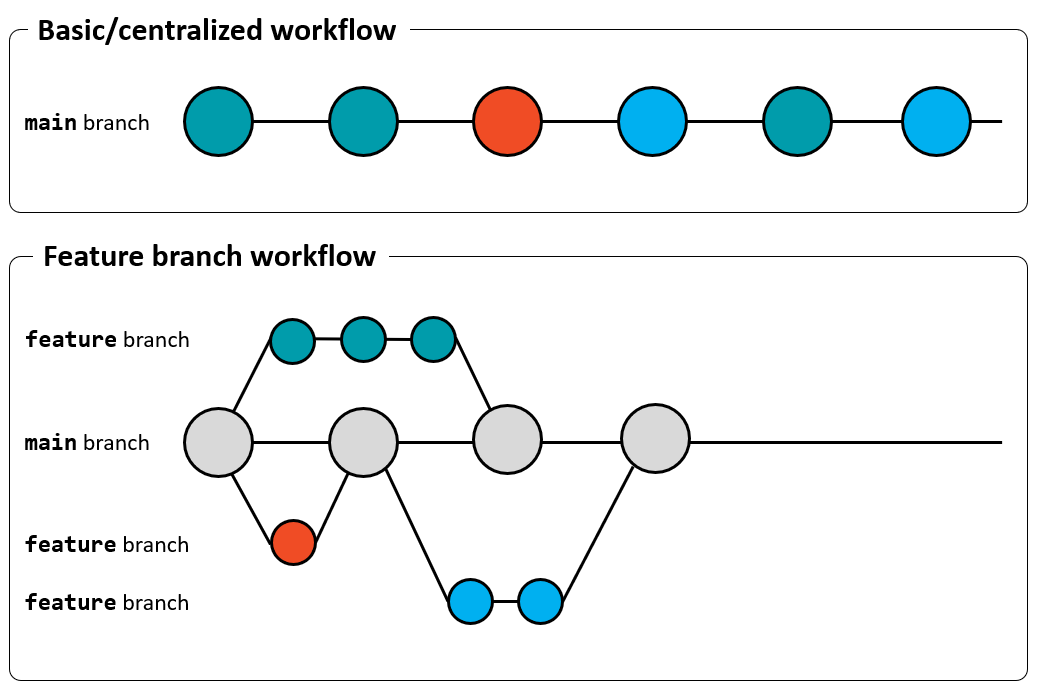
- For team projects, it is therefore considered to be good practice to use the feature branch workflow, where multiple branches (one for each feature) are used
# Workflow description
- Suppose you have to take care of a specific project feature/task (implement a new functionality, fix a bug, ...)
- Create a branch from the (most recent version of the)
mainbranch- Tip: Include your initials (or name) and a good description of the task in the feature branch name
- Example:
git branch jj-change-home
- Switch to this newly created branch
- Example:
git checkout jj-change-home
- Example:
- Do your magic on this branch
- Possibly multiple commits, all locally
git add .git commit -m "commit message"
- When ready, push your branch to GitHub and ask (one of) your team members to review/validate your work and merge it with the main branch (= Pull Request)
git push(copy, paste and execute the full push command that Git shows you!)- Go to the GitHub page of the repo and make a pull request
- Switch back to the
mainbranch, pull its most recent version and start all over again at step 1.git checkout maingit pull
- Create a branch from the (most recent version of the)
WARNINGS
- When you work on your project, always check first (use
git status) whether you have really switched to a feature branch! - NEVER make any project changes on the
mainbranch!
(In the repo of your group project, you won't even be able to push anything to thismainbranch)
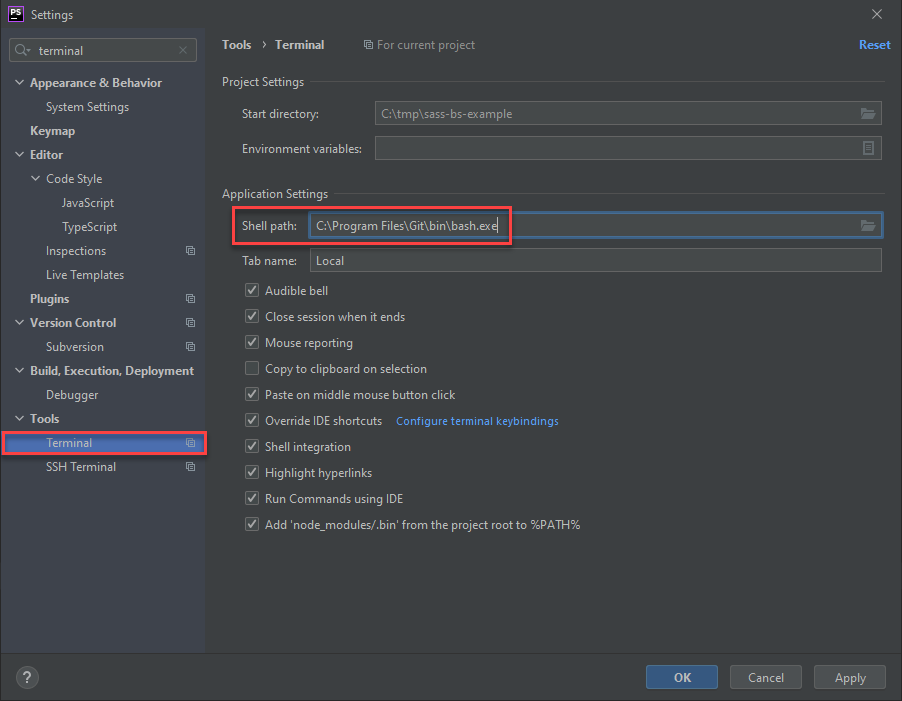
TIP
By changing the PhpStorm terminal (from cmd) to Bash, the branch name is made visible (between brackets) after the prompt:


- When reviewing a pull request, you have 3 options:
- Approve: submit your feedback and approve merging the changes proposed in the pull request
- Comment: leave general feedback without explicitly approving the changes or requesting additional changes
- Request changes: submit feedback that must be addressed before the pull request can be merged
REMARK
If you (are asked to) update your code, be sure to switch back to the specific branch (git checkout ...) to commit/push the necessary corrections
- Merge conflicts
- After a pull request is approved, it might happen that it cannot be merged (into the main branch) because there are conflicts
- These conflicts are indicated by the markers
<<<<<<<,=======and>>>>>>>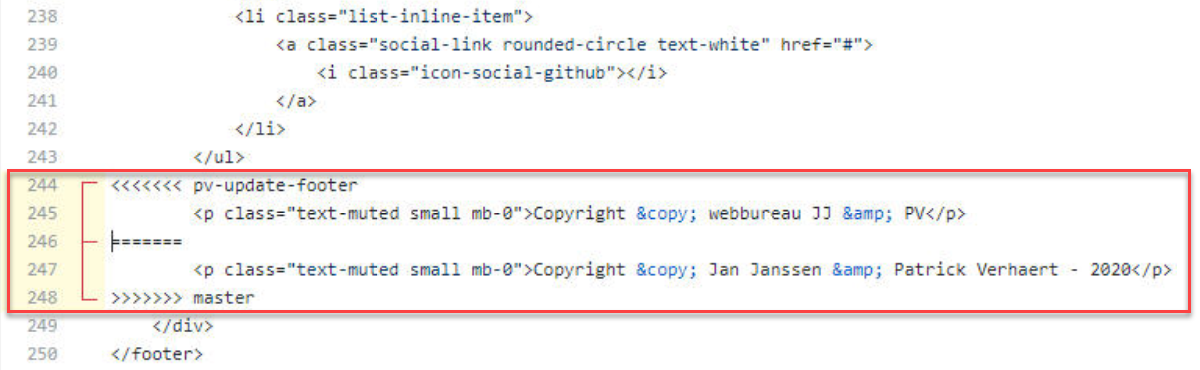
- Between
<<<<<<<and=======you can find the code in the branch corresponding to the pull request - Between
=======and>>>>>>>the conflicting code (in the default branch) is shown
- Between
- To resolve these conflicts, remove the conflict markers and modify the code to be kept in the final version (one of the code fragments or a combination of both)
REMARKS
- Most (simple) conflicts can be resolved online (on the GitHub site) using the approach explained above
- If your conflict can't be solved in the browser, contact your teacher (as the instructions provided by GitHub are not applicable in our case) ...
# Flowchart
- Download Feature branch workflow - Flowchart as PDF
# Example scenarios
- In the screen capture below, this flowchart is illustrated by means of two example scenario's (without and with conflict)
- Download Feature Branch workflow - Example scenarios as PDF