# Fetch API
- Getting data from an API or from a database is a tree-stap action
- Calling the
fetch()methode to starts a request
Thefetch()methode returns a promise (see later in this course) - When the request completes, the promise resolves a response object
- This response returns a lot of information, but the actual data can be extracted in JSON format (with
response.json()) or in raw text (withresponse.text())
- Calling the
- The response of the
fetch()methode will pass through the chain (one or more) of.then()handlers to process the data and a.catch()handler to process the errors
fetch().then().then().then().catch();
IMPORTANT
- Every
.then()handlers MUST returns something so it can be used as input data for the next.then()handler - With the the
fetch()methode, the first.then()handlers always must returnsresponse.json()(if the response is in JSON format) orresponse.text()(if the response is just raw text)
fetch()can handle all the different HTTP verb methodes (opens new window) you can expect from a CRUD (Create, Read, Update and Delete)
| verb (methode) | action | description |
|---|---|---|
| GET | read | get date from an API, database, ... |
| POST | create | post date to an API, add data to a database, ... |
| PATCH/PUT | update | update a record in the database, ... |
| DELETE | delete | delete a record from the database, ... |
- The
fetch(url, options)methode accept two parameters:url: the URL to fetch fromoptions: some optional parameters
- A full description of all options can be found here (opens new window)
The ones you use the most are:
| option | possible values |
|---|---|
method | GET (default), POST, PUT, DELETE, ... |
headers | 'Content-Type': 'application/json', ... |
body | JSON.stringify(data), ...( data type must match Content-Type header) |
# Basic HTTP verbs
- To demonstrate a very basic example of the different verbs, we use the https://reqres.in/ (opens new window) API
- This is a fake API where the create, update and delete actions are not actually taking place, but the response 'fakes' this is really happens
# GET
- Use the
getmethode to retrieve data from an API or from a database - You don't have to explicitly set this methode, because this is the default methode when for
fetch() - To retrieve information with
fetch(), you only have to pass the URL as a parameter - Open es6/fetch/get.html and es6/fetch/get.js
- This example gets all the users on page 2 with this URL: https://reqres.in/api/users?page=2 (opens new window)
- We are only interested in the key
datawitch contains an array of six users

# POST
- Use the
POSTmethode to send new data to an API or insert something in a database - The data that will be sent to the API and the methode (
POST) are past to theoptionsparameters of thefetch()methode - Open es6/fetch/post.html and es6/fetch/post.js

# PATCH/PUT
- Use the
PATCH(orPUT) methode to update data through an API or update something in a database - The data that will be sent to the API and the methode (
PATCH) are past to theoptionsparameters of thefetch()methode - Open es6/fetch/patch.html and es6/fetch/patch.js

# DELETE
- Use the
DELETEmethode to delete data through an API or delete something from a database - The methode (
DELETE) is past to theoptionsparameters of thefetch()methode - Open es6/fetch/delete.html and es6/fetch/delete.js

# Error handling
- The
fetch()promise will reject (trow an error that will be handled bij thecatch()) handler ONLY if:- a network error occurs
- a CORS (opens new window) header is sent by the server
- the base URL don't exists
- In every other situation e.g: faulty parameters on the URL, access not allowed, etc... the
fetch()promise will resolve, and you have to deal with these kind of errors yourself - This can be easily done within the first
then()handler, just before returningresponse.json() - When we look at the response object (opens new window), there are tree properties we can use to test the status of the
response (look at the result tab on the
GETand theDELETEexample)
| property | description |
|---|---|
status | status code (opens new window) e.g: 200 (ok), 404 (not found), 403 (forbidden), ... |
ok | true if status code is in the range of 2xx otherwise false |
statusText | which corresponds to the HTTP status code (but most of the time this string is empty) |
- Now you can trow an error if
response.okisfalse, else sentresponse.json()to the nextthen()handler - Some possible scenarios to respond to an error:
- Open es6/fetch/error.html and es6/fetch/error.js
- This time we use jsonplaceholder (opens new window), another frequently uses fake API
- Open the console and look what's inside
response.ok,response.codeand the error message


# Preloader
- Fetching data from an API sometimes takes a few seconds
- It's always a good idea to show your visitors some kind visual information that something is happening in the background
- This can be in the form af a preloader, a pinner or a simple text message
- Show the preloader just before fetching the data and hide the preloader when the data is rendered to the page or when an error occurred
function getUser() {
    fetch(url, options)
        .then((response) => { ... })
        .then((res) => {
            // do something with the response
            preloader.style.display = 'none'
        })
        .catch((error) => {
            console.error(error);
            preloader.style.display = 'none'
        });
}
preloader.style.display = 'block';
getUser();
1
2
3
4
5
6
7
8
9
10
11
12
13
14
2
3
4
5
6
7
8
9
10
11
12
13
14
# Examples
As we will not be using a backend of our own in this course, we will only discuss examples where we are retrieving data from external API's
# Fetch images
- Open /es6/fetch/images.html and /es6/fetch/images.js
- In this example we fetch all images from our own (fake) API:
https://my-json-server.typicode.com/pverhaert/itf-api/picsum (opens new window)

# Fetch movie info
- Open /es6/fetch/omdb.html and /es6/fetch/omdb.js
- Serialize form (opens new window)
- In this example we fetch movie information from the OMDb API (opens new window)
- The parameters we needed are:
apikey: your API key (you must first generate a free apikey (opens new window))t: the movie title to search fory: year of releaseplot: can befullorshort
- The JSON we get from te server: https://www.omdbapi.com/?apikey=yourKey&t=Pulp+fiction&y=&plot=short (opens new window)
(ReplaceyourKeyin the query string with a real API key)

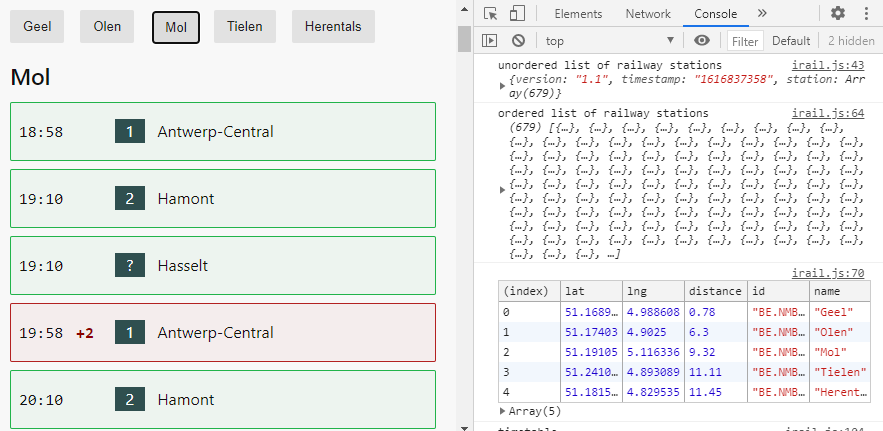
# Belgian railway schedules (advanced)
- Open es6/fetch/irail.html and es6/fetch/irail.js
- For this example we our exact location and two API cals
- Use the Geolocation API to get your exact location
- Grab a list of all Belgian railway stations from https://api.irail.be/stations/?format=json&lang=en (opens new window)
- Grab a timetable from one of your closest railway stations
E.g: the railway station of Geel has anidofBE.NMBS.008832433
https://api.irail.be/liveboard/?id=BE.NMBS.008832433&format=json&lang=en (opens new window)
READING TIPS
- Fetch API@Mozilla (opens new window)
- Fetch API@W3Schools (opens new window)
- Fake REST API's to test with:
WATCHING TIPS